Contenus
Les contenus sont les éléments constitutifs du système d’Omeka.
Items don’t have to represent physical objects (photographs, maps, books), nor do they have to have attached media (a scan of a photo, or multiple page images, or a PDF). An item can be used as a node - a way to represent a person, place, or thing. You can use items and their classes to create separate types of nodes that serve the purposes of your sites.
Items can be linked to other items, or contained within item sets, to represent complex relationships. For example, an item used as a location can be linked to items representing events that happened at that location, and the event items can be linked to people items who were at that event, who themselves are linked to textual items that they created, or photographic items that they appear in. All of these items can be grouped in overlapping item sets that represent jurisdictions that contain locations, events, and people during a particular duration of time. Or you can use item sets to represent people, that contain their created works as items, and link those people item sets to events and photographs.
Many of these classes, and many resource templates to help you describe these types of items, already exist in a basic Omeka S installation, but you can modify them and add more as needed.
Item permissions
When a user creates an item, they become the « owner » of that item. Most user levels have the ability to create items, and can always delete their own items. Only higher levels can delete items that others own.
Category |
Permission |
Global Admin |
Supervisor |
Editor |
Reviewer |
Author |
Researcher |
|---|---|---|---|---|---|---|---|
Items & media |
Add |
Yes |
Yes |
Yes |
Yes |
Yes |
No |
Edit |
All |
All |
All |
All |
Their own |
No |
|
Delete |
All |
All |
All |
Their own |
Their own |
No |
|
Value annotations |
Add/Edit |
Yes |
Yes |
Yes |
Yes |
Yes |
No |
Private objects |
View |
Yes |
Yes |
Yes |
Yes |
No |
No |
Note that when you change a user’s role, for example from an Author to a Researcher, they will still own the items they created when they had permission to do so. Items are not transferred. Deleting a user orphans their items - they will appear as having no owner. You cannot currently search and batch-edit items without an owner, so the best practice is to re-assign these items before deleting the user account.
Site permissions for items
All items in an Omeka S installation are available for addition to all sites, but must be added to a site either manually or through user-specific or site-specific settings.
Each site can be set to have all new items automatically added to it.
Each user can have one or more sites to always add new items to by default. If a user has a site set as their « Default sites for items », they must also be added to the site as a Creator or Manager in order for that setting to work.
Category |
Permission |
Site Manager |
Site Creator |
Site Viewer |
Global Admin |
Supervisor |
|---|---|---|---|---|---|---|
Contenus |
Add to site |
Yes |
Yes (by default), manually no |
No |
Yes |
Yes |
Remove from site |
Yes |
No |
No |
Yes |
Yes |
The Items tab
Items are listed in the Items tab (with the box icon) in the left-hand navigation of the administrative dashboard.
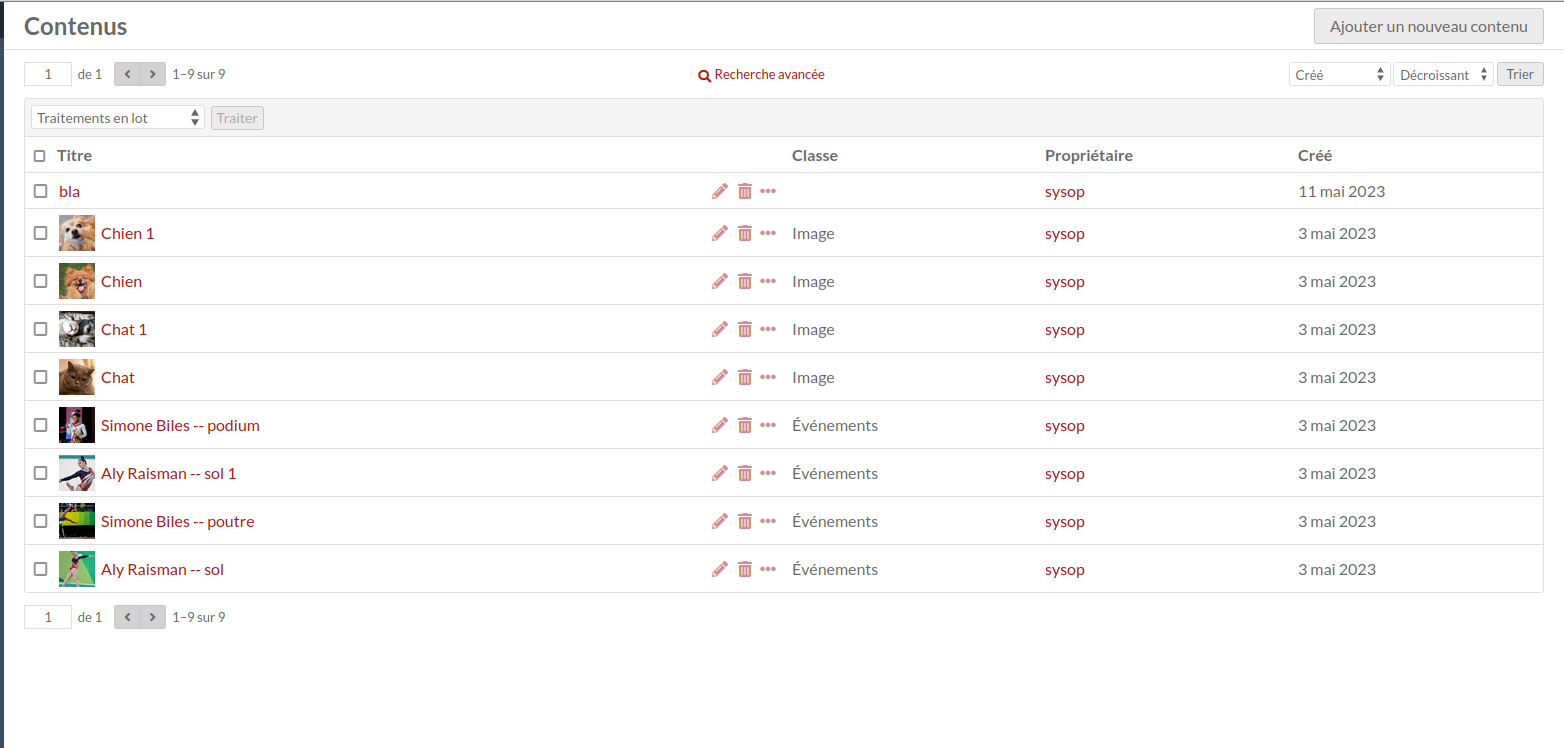
Chaque contenu occupe une ligne organisée en colonnes contenant :
le Titre
des icônes pour éditer (crayon), supprimer (poubelle) ou accéder aux détails (points de suspension)
la Classe
the item’s Owner
la date à laquelle le contenu a été Créé.
En haut à droite de la fenêtre Contenus se trouve le bouton « Ajouter un nouveau contenu ».
Les options de navigation et de création des contenus se trouvent au niveau de l’en-tête de la table des contenus.
À gauche, on trouve les commandes de navigation, dont des flèches avant et arrière et un encart contenant le numéro de page actuel — pour changer de page, y entrer un numéro de page valide et cliquer sur Entrée.
Le lien vers la Recherche avancée se trouve au milieu de l’en-tête.
La partie droite de l’en-tête réunit dans deux menus déroulants les options de la table des contenus. Les contenus sont triés par date de création, en partant du plus récent (Créé et Décroissant). Le premier menu propose des options de classement par Titre, Identifiant*, Classe, Propriétaire et Créé (date) ; le second menu permet d’organiser les contenus par ordre croissant (de A à Z ou du plus récent au plus ancien) ou décroissant (de Z à A ou du plus ancien au plus récent). Pour appliquer les options de tri à la table des contenus, cliquez sur le bouton « Trier ».
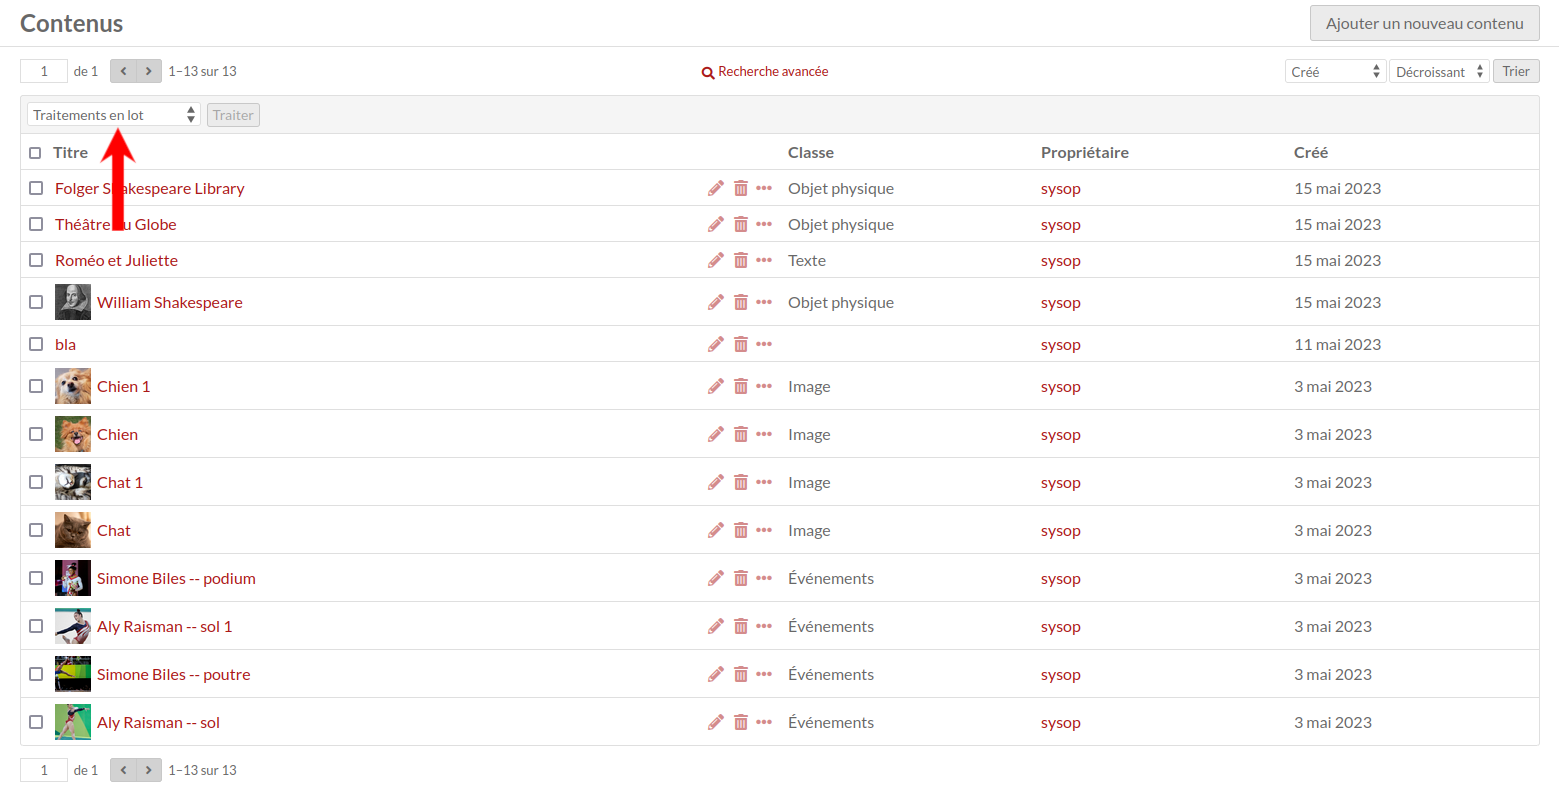
Un menu déroulant pour le traitement par lots (modifier sélectionnés, modifier tout, supprimer sélectionnés et supprimer tout) se trouve sur la gauche, entre l’en-tête et la table des contenus.
Accéder aux contenus
To quickly view the basic information about an item, click the Details (ellipsis) button in the row for the item, located next to the edit and delete buttons. This will open a drawer to the right of the list which displays the item’s title, description, visibility, any sites it is used in, and its associated media.
Pour accéder à la vue complète d’un contenu, cliquer sur son titre, soit dans la table des contenus, soit dans le volet des détails.
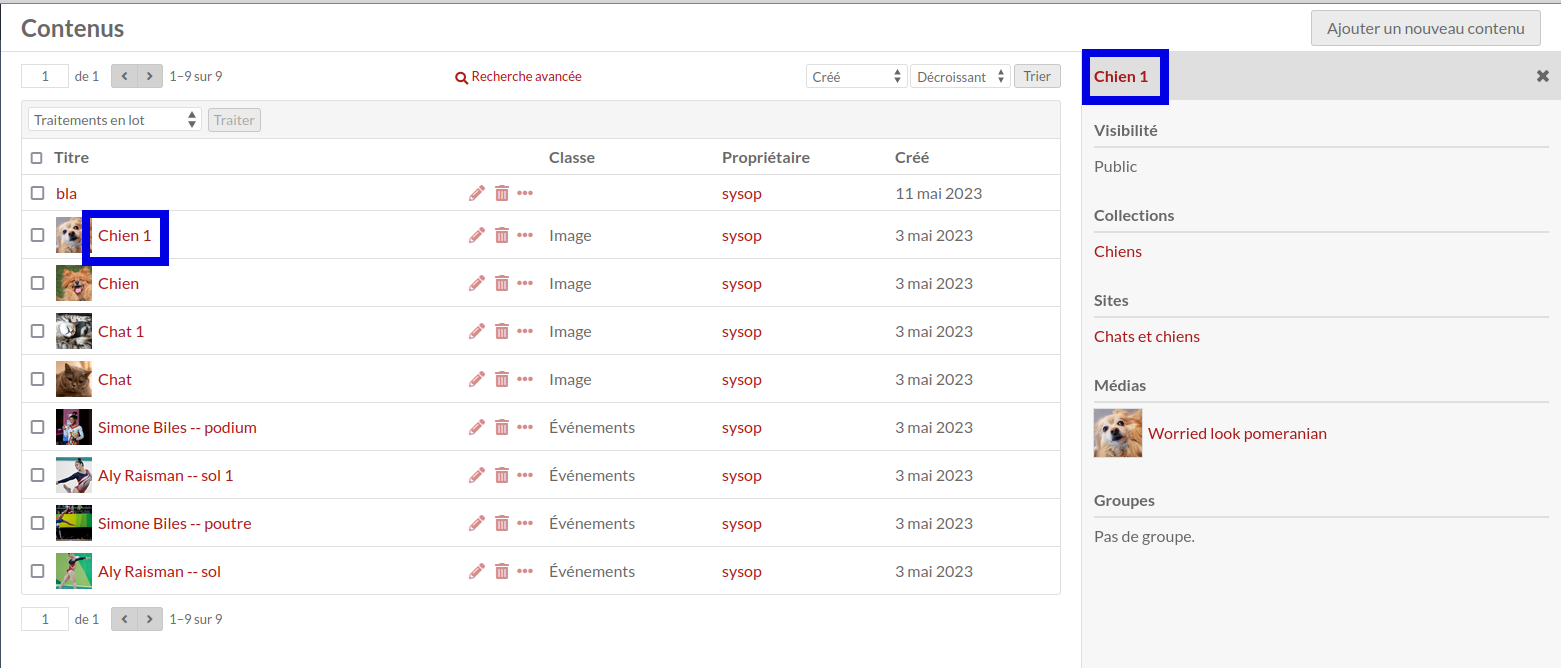
Les encadrés bleus indiquent où cliquer pour accéder au contenu complet.
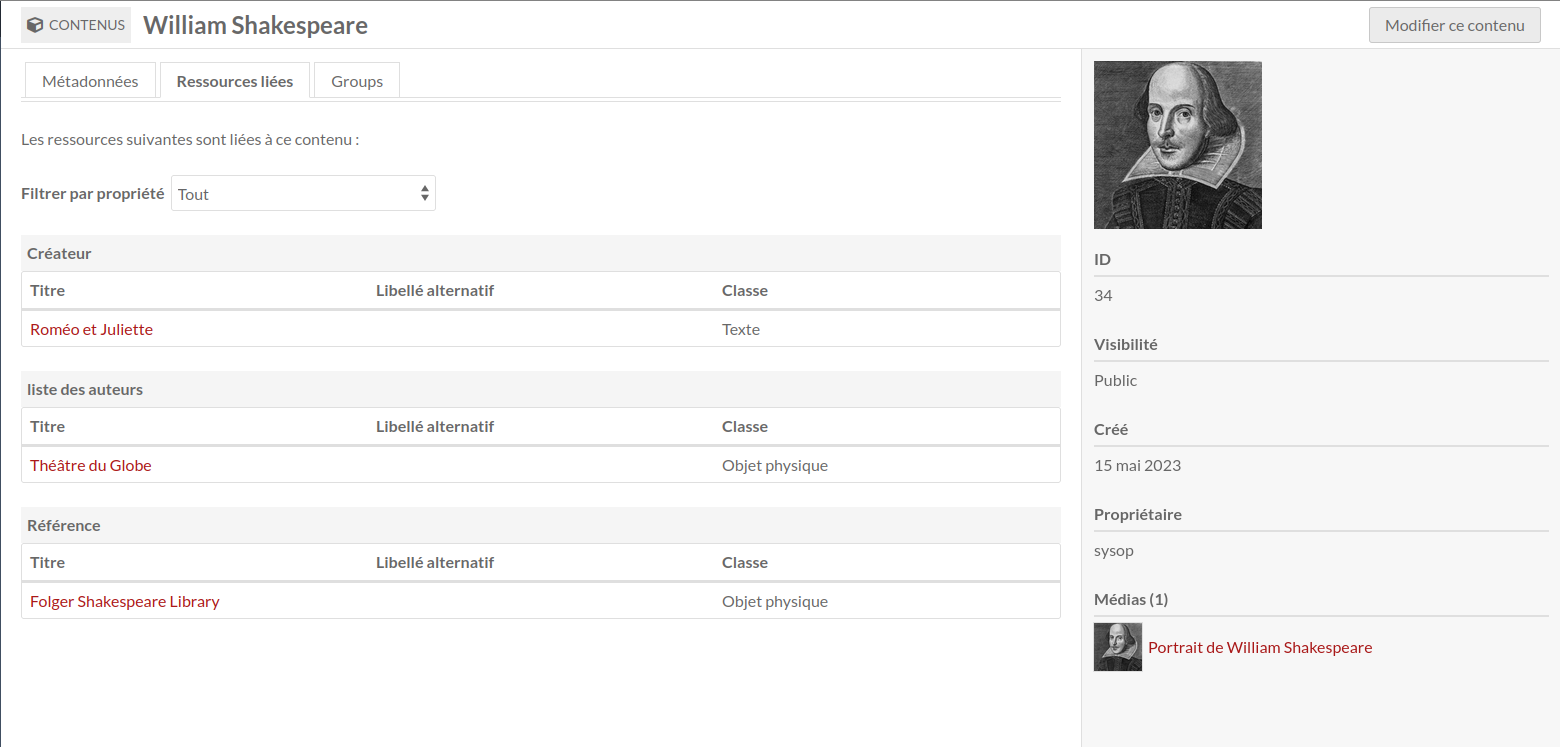
When you view an individual item, there are tabs for the item’s Metadata and its Linked Resources. The right side of the page displays the item’s media, any item sets to which it belongs, its creation date, owner, and visibility.
Linked resources
An item’s linked resources are other Omeka resources (items, item sets, or media) that are linked to this item through their properties. Note that this section only shows resources that have been linked to this item (which have it for a property); resources that are linked from this item will display in the property they fill.
Linked resources are grouped by the property for which they use the current item. In the example below, the current item « William Shakespeare » is used for the properties « Creator », « References », and « list of authors » for the linked resources.
Le menu déroulant « Filtrer par propriété » permet de sélectionner les ressources liées renvoyant à une propriété spécifique. Ce menu n’affiche que les propriétés effectivement utilisées.
When a resource is viewed on a public site, linked resources are displayed in a series of tables based on the metadata property in use. Resources are sorted by resource type (item, item set, or media) and only one type is displayed at a time. A resource without any linked resources will not display these tables. The tables can be included, excluded, or rearranged using site theme settings, under « Configure resource pages ».
A resource with links to other resources that are not included in the given public site will display those non-included resources anyways. Those linked resources will appear to be part of the site (that is, you can click on them to see item and item set pages). This setting can be turned off for each site. When non-site resources are excluded, the item’s metadata values and the linked resource tables will not display excluded Omeka resources.
Note that media pages do not display linked resource tables, whether items link to them or not.
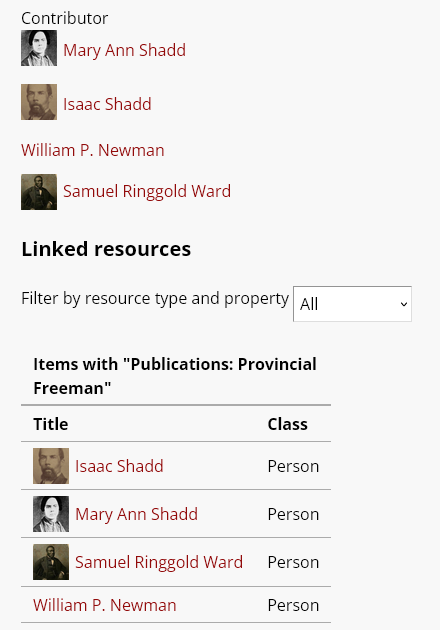
The following item has a number of Omeka resources included in its « Contributors » property, showing as part of its metadata. It also has those same items linking back to it, showing in the linked resources table.
The display of Linked resources on resource pages can be configured on each site. Click on « Theme » and then click the button that reads « Configure resource pages », then decide if and where to display the « Linked resources » tables for each resource.
You can also control whether resources that are linked will display those links even when the resources in question are not included in the given site. Under Site settings, in the « Show » section, you will find a checkbox for « Exclude resources not in site. »
Ajouter un contenu
Cliquer sur le bouton « Ajouter un nouveau contenu ».
Avant de créer des contenus, les administrateurs peuvent créer des Modèles de ressources qui n’afficheront que certains champs spécifiques à tel ou tel type de contenu.
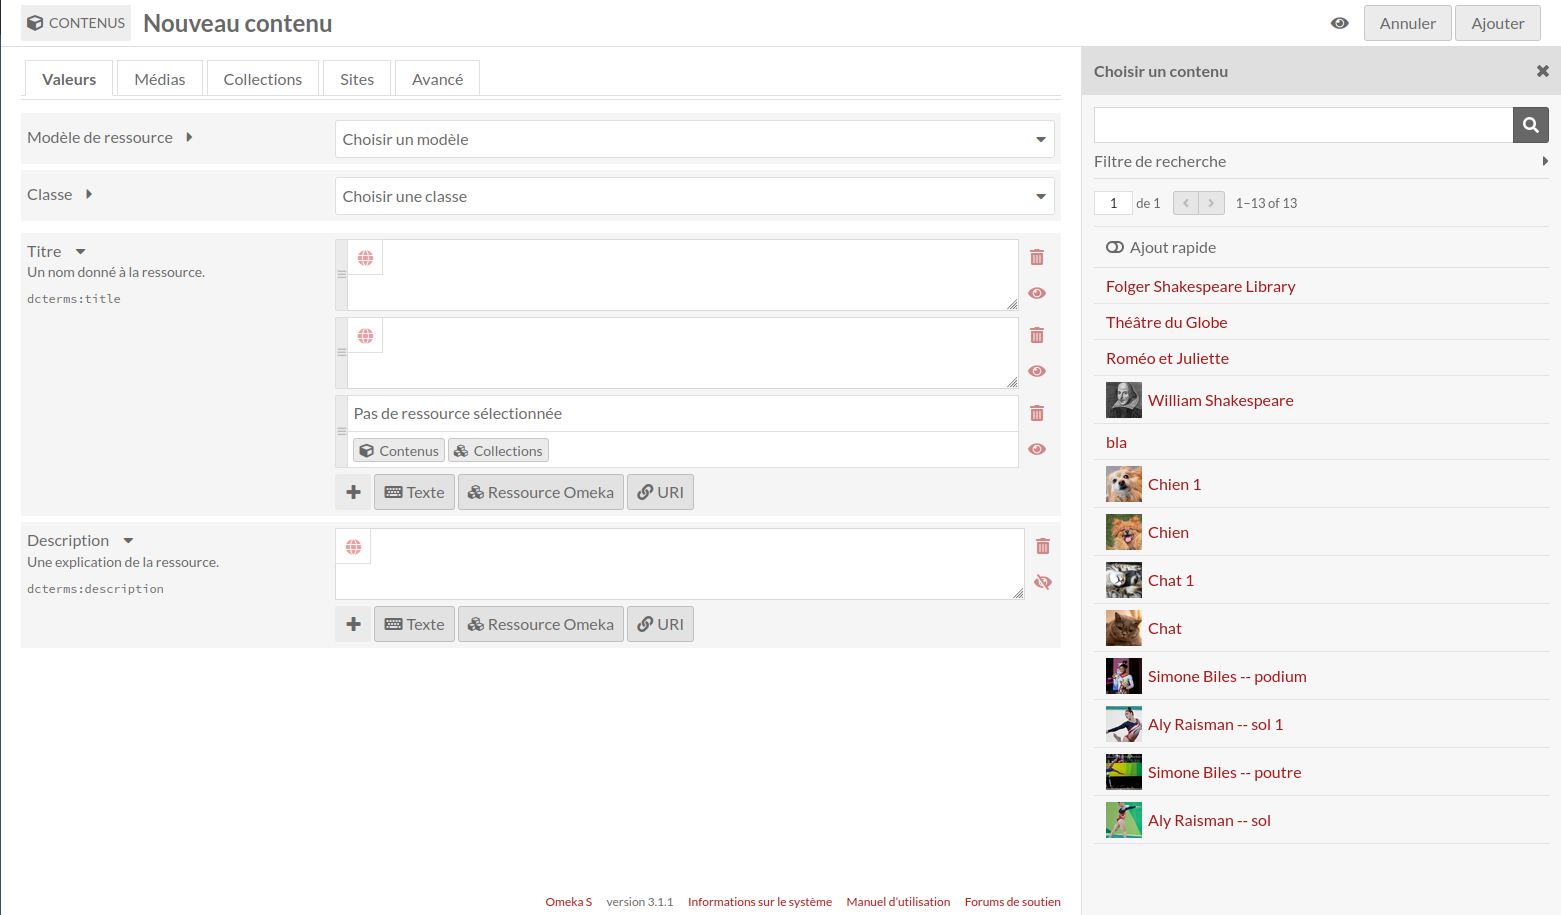
Valeurs
L’onglet Valeurs sert à la saisie des métadonnées, telles que le titre, la description, etc.

Un menu déroulant permet de sélectionner un modèle de ressource, prédéfini par les superviseurs et éditeurs.
If using a resource template, the item class should automatically load.
Sans modèle de ressource, une classe peut être sélectionnée dans le menu déroulant (celui-ci est alimenté par les Vocabulaires installés sur votre instance).
Remplissez les champs qui apparaissent. Si ni modèle de ressource ni classe n’ont été sélectionnés, les propriétés Dublin Core Titre et Description apparaissent par défaut.
Whether or not you use a resource template, you can add more properties to the item using the drawer on the right side of the screen. You can simply open one of the vocabularies (Dublin Core, Bibliographic Ontology, etc.) and click on the property you want to add, or you can use the « Filter properties » box to search for a specific property (this is helpful when you have multiple large vocabularies).

Clicking on the property label in the drawer will automatically add it to the item. If you add a property by accident, leave it blank and it will be removed from the item when you save your changes.
Chaque champ peut être rempli avec du texte, une ressource de votre instance Omeka ou un lien externe.
You can set individual properties as private or public using the eye icon for each property. Note that properties set to private are still visible to Global Admins, Supervisors, and Editors. Authors will be able to see all properties on items they own, but will not see private properties created by other users.
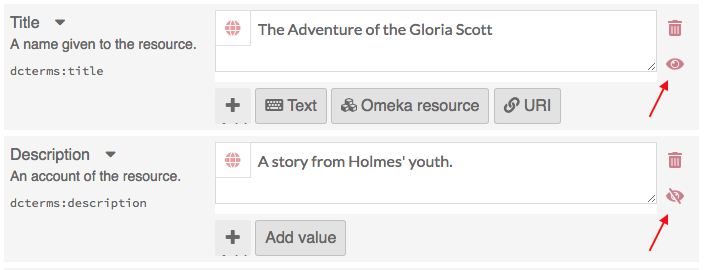
Dans l’exemple ci-dessous, la première propriété (Titre) est publique, comme l’indique l’icône oeil ouvert. La deuxième propriété (Description) est privée, comme l’indique l’icône oeil barré. Cliquer sur l’icône oeil fait alterner entre les statuts public et privé.
If you have multiple values for a property, you can reorder them by dragging and dropping. Click on the bar on the left of the value to grab that value, and drag it into the order that you want it.

Texte
Text fields allow for unformatted text entry. No markup is allowed in these fields (e.g. Markdown, HTML).

You can indicate the language for the content of a text input using the globe symbol above the input (see the red arrow in the image below). Click on the globe to activate a text field, then enter the IETF two-letter Language tag code for the language in which the text is written.

Ressource Omeka
Choosing an Omeka resource as a metadata value creates an internal link between the resource you are creating and the resource that fills that field.
When creating an item, you have the option to use either another item or an item set. If the item has media attached, you can also choose from within that media - not other media in the installation.
Choosing a resource type will open a side drawer where you can browse all of those resources in the installation. You can use the search function at the top of the drawer to narrow down the list or to quickly find a specific resource.
Once you select a resource, detailed information will load, and you must click « Select resource » to finish linking the resources. You can also click the « X » button in the upper right-hand corner to go back to the list of resources.
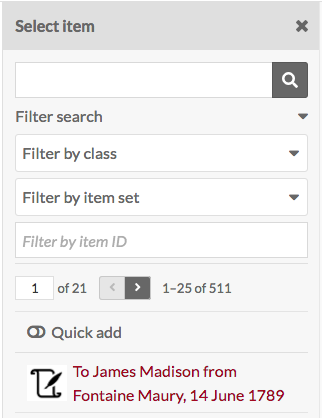
If you are using an Item resource for the property, you will have three additional options for finding the item you want in the drawer. Open these options by clicking the triangle button next to the phrase « Filter search ». This will open a menu with the following options to filter the items in the drawer:
Filtrer par classe : un menu déroulant qui permet de sélectionner une propriété fournie par les vocabulaires de l’instance.
Filtrer par collection : un menu déroulant qui permet de limiter les contenus à ceux associés à une collection spécifique.
Filter by item ID: A text field where you can input the ID of the item you want to use. You can find an item’s ID in the URL of its edit page; if you are editing the item and the URL is
admin/item/11547/editthen the item’s ID is 11547. An item ID will also appear in the right-hand drawer on its view page. You cannot enter a range or search by a partial number or a wild card - only an exact ID.
Once you enter something into a filter, you need to click on the magnifying glass icon in the search bar to apply your filters.
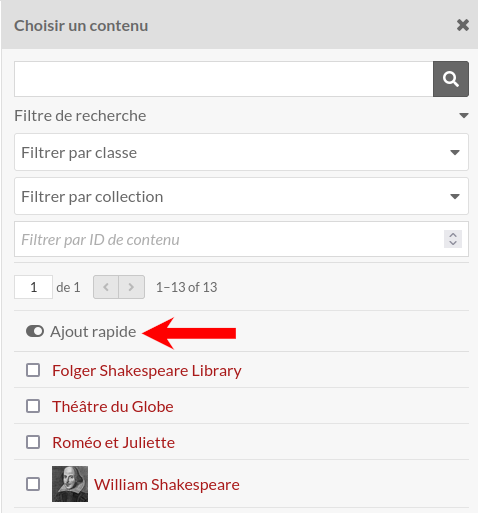
Item resources also have an option for « Quick add ». When this switch is flipped, all of the items in the drawer have a checkbox. You can use these checkboxes to add multiple items as a property at once. Note that you can only edit one property at a time, so all of the items must populate the same property (e.g. « Creator », « Has Part »).
If you are using an Item set resource for the property, you will have two options for finding the item set you want in the drawer:
Filtrer par classe : un menu déroulant qui permet de sélectionner une propriété fournie par les vocabulaires de l’instance.
Filter by item set ID: A text field where you can input the ID of the item set you want to use. You can find an item set’s ID in the URL of its edit page; if you are editing the item and the URL is
admin/item-set/15/editthen the item set’s ID is 15. An item set ID will also appear in the right-hand drawer on its view page. You cannot enter a range or search by a partial number or a wild card - only an exact ID.
Once you enter something into a filter, you need to click on the magnifying glass icon in the search bar to apply your filters.
Item set resources also have an option for « Quick add ». When this switch is flipped, all of the item sets in the drawer have a checkbox. You can use these checkboxes to add multiple item sets as properties. Note that you can only edit one property at a time, so all of the item sets will populate the same property (e.g. « Creator », « Has Part »).
URI
URI fields link to an external website or online resource. You can use this to indicate an authority file from elsewhere on the web, or even indicate resources in other Omeka platforms.
You can optionally provide a label that will obfuscate the URI, which is required. You can also enter in a IETF two-letter Language tag to identify the language of whatever the URI points to.
Vous pouvez ajouter d’autres champs en sélectionnant une propriété dans la liste située à droite, en parcourant les champs par vocabulaire (Dublin Core, Bibliographic Ontology, etc.) ou en faisant une recherche dans la barre filtrer les propriétés qui se trouve au-dessus de la liste des vocabulaires.
Annotation des valeurs
When you input a value for a property associated with a resource, you are making a statement about that resource. If you choose, Omeka allows you to make statements about that statement. We call this value annotation. The advantage of value annotation is that you can choose to make ambiguous facts more concrete by annotating things like:
Provenance : quelle est la source de ce fait ?
Date : quand ce fait s’est-il produit ?
Lieu : où ce fait a-t-il eu lieu ?
Certitude : quel est le degré de certitude de ce fait ?
Type : quel type de chose/concept constitue ce fait ?
Dans le monde des données liées, ce processus s’appelle la réification. Chaque valeur peut avoir plusieurs annotations.
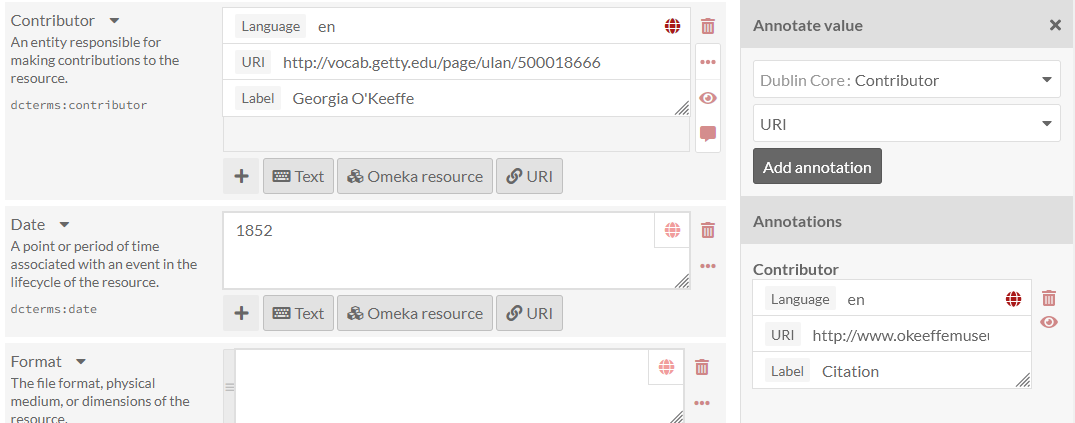
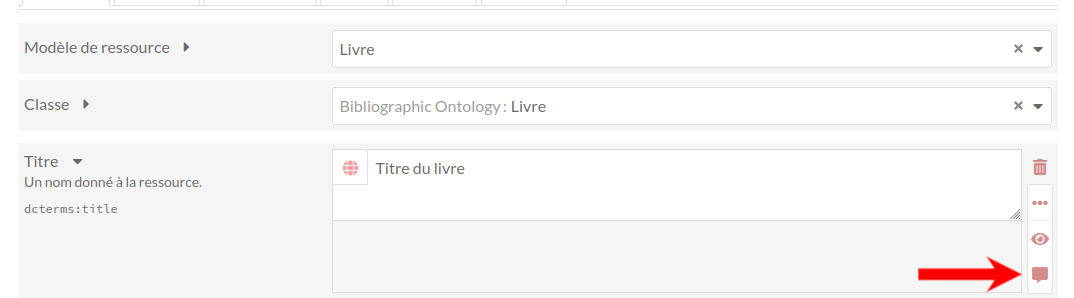
To create an annotation, click on the ellipsis on the right side of the value input interface, and then click on the annotation icon (the speech bubble).
The annotation sidebar will open to the right. Select any property that is available within the Omeka S installation to describe the relationship between the annotation and the value it describes. For instance, the value for associated with the property dcterms:Contributor might be annotated with more detail about the nature of the contribution. Or you may wish to simply include a note using the dcterms:Description field.
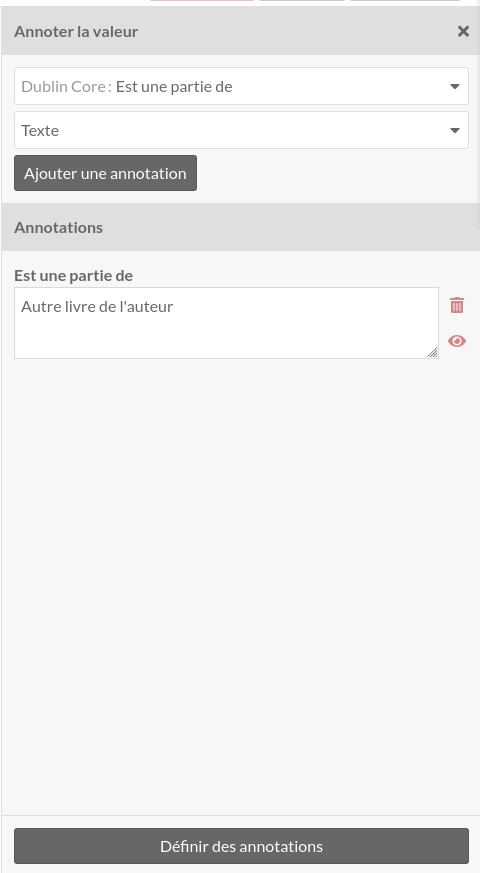
Select a data type for the annotation: a text field, a URI, or resource in your Omeka S installation. Modules may make additional data types available. Click the « Add annotation » button and a new field will appear below. Input your annotation. You can do this multiple times for the chosen value if desired. Then click « Set annotations » to finalize the process.
Each site has a setting to indicate whether or not value annotations are visible to the public. This will include value annotations on item sets and media.
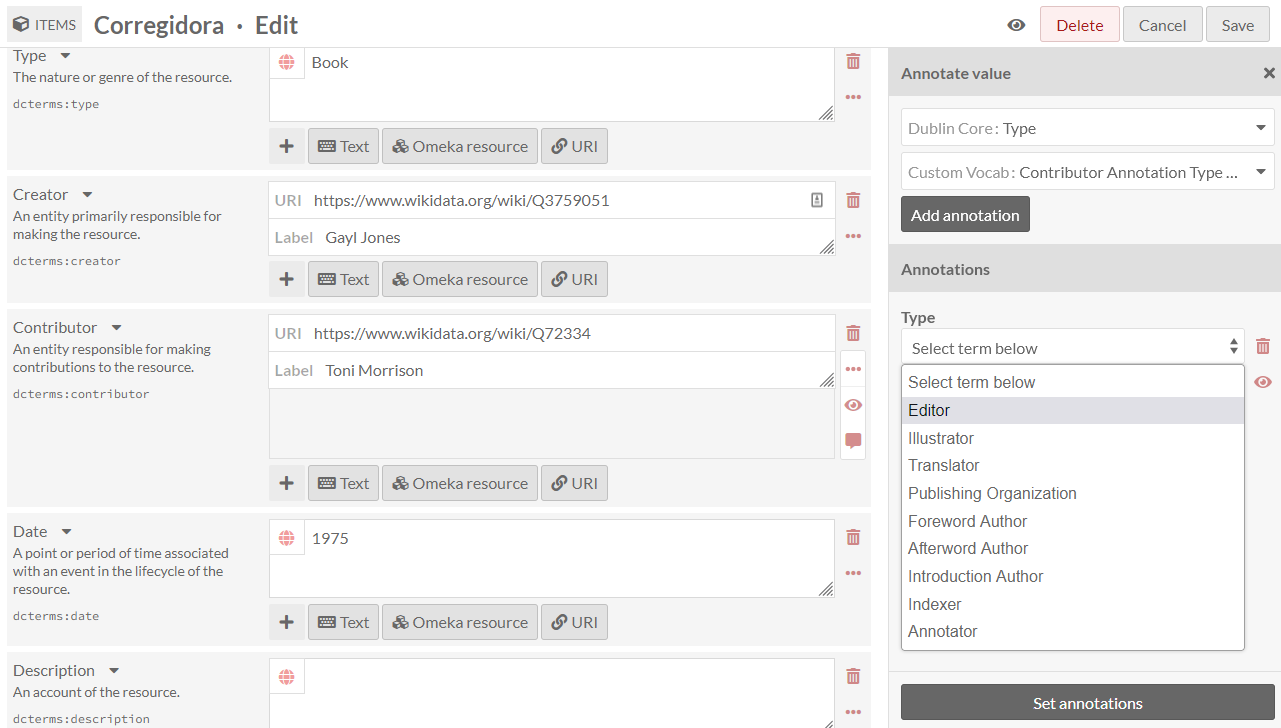
You can set controlled vocabularies for annotations using the Custom Vocab module. In this case, you do not need to apply a custom vocabulary to a property using a resource template; you can select any installed vocabulary from the value-type dropdown in the drawer. This will load your vocabulary’s choices into a dropdown of terms.
Médias
Use the Media tab to add images, video, or other files.
Using the buttons on the Add New Media menu on the right side of the screen, select a media type (Upload, URL, oEmbed, IIIF, YouTube, or HTML). Modules, such as File Sideload, can add more ways to gather media into Omeka. Other modules can import materials from other platforms directly into Omeka as items with attached media, such as the Zotero import module.
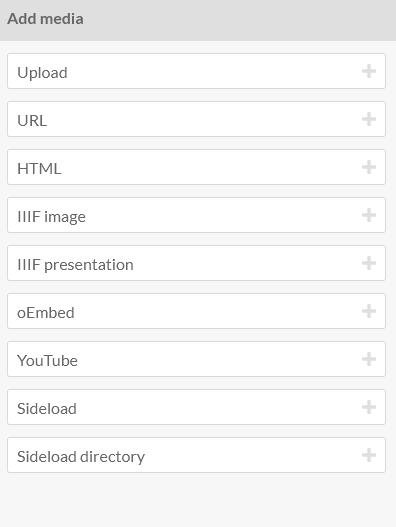
Charger ; sélectionner un fichier depuis votre ordinateur.
URL : importer un média via une URL.
HTML : ajouter du contenu html.
IIIF image: Add an IIIF image via URL.
IIIF presentation: Add an IIIF presentation via URL.
oEmbed : insérer une représentation embarquée d’une URL extérieure. Cette action ne fonctionne qu’avec un contenu tiré d”une implémentation oEmbed préexistante - utiliser l’URL de votre barre de recherche.
YouTube: add a link to embed a YouTube video. Use the URL from your browser’s location bar (with
/watch/in it) rather than ayoutu.belink.
Un média peut toujours être modifié : se rendre dans la page d’édition du contenu, puis dans l’onglet Médias et cliquer sur le bouton d’édition (crayon).
L’instance d’un média associée à un contenu peut être supprimée grâce au bouton supprimer (poubelle) dans le coin supérieur droit du bloc média.
Si vous avez plus d’un média pour un contenu, vous pouvez les réorganiser en déplaçant les différents blocs média (se positionner sur l’icône représentant trois traits dans le coin supérieur gauche du bloc).
Omeka S utilise le premier média pour créer la vignette de présentation d’un contenu sur les pages de navigation et de vue des contenus.
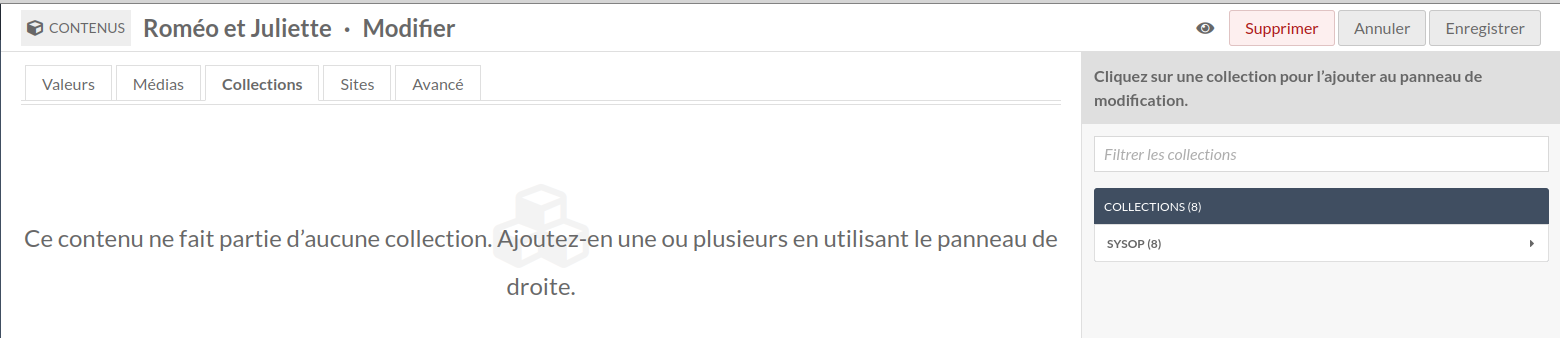
Collections
Vous ne pouvez ajouter des contenus qu’à une collection déjà existante.
Dans le menu situé à droite, cliquez sur le créateur de la collection, puis sur le nom de la collection pour y ajouter un contenu.
Vous pouvez également filtrer les collections en utilisant la barre de recherche située au-dessus de la liste des utilisateurs.
Pour supprimer le lien entre un contenu et une collection, cliquer sur le bouton supprimer (poubelle) à la droite du titre de la collection.
Sites
Sélectionner les sites auxquels ajouter les contenus.

Pour ajouter un contenu à un site, sélectionner un site dans le menu du volet de droite. Vous pouvez filtrer les sites en utilisant la barre de recherche en haut du volet.
Si le paramètre « rattacher automatiquement les nouveaux contenus » est activé pour certains sites, utiliser cet onglet pour retirer des contenus de ces sites. Cliquer sur l’icône poubelle à la droite de la ligne du site pour retirer le contenu.
Avancé
L’onglet Avancé contient deux options : l’une permet de choisir une vignette pour le contenu ; l’autre permet de modifier le propriétaire du contenu.
Thumbnail
Omeka S utilise par défaut le premier média attaché à un contenu pour créer sa vignette. L’onglet Avancé permet d’utiliser comme vignette une image ne faisant pas partie des médias associés.

Les vignettes ainsi ajoutées ne s’affichent pas sur la page publique du contenu. Elles peuvent alors être utilisées pour les contenus qui n’ont pas de média associé mais pour lesquels une vignette est utile dans les pages de recherche et de navigation, ou pour des contenus dont les médias (des fichiers vidéo ou audio par exemple) ne permettent pas de créer une vignette élégante.
Les éléments chargés comme vignettes par ce procédé sont les mêmes que ceux créés pour les logos de site.
Pour sélectionner une vignette, cliquer sur le bouton Choisir : un volet s’ouvrira sur la droite.
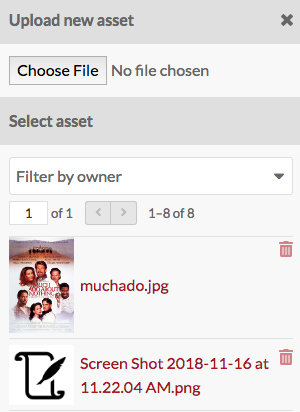
Le volet propose deux options : charger un fichier ou sélectionner parmi les vignettes existantes. Dans le second cas, cliquer sur la vignette, qui sera automatiquement associée au contenu.
Pour supprimer une vignette, appuyer sur le bouton Retirer sous celle-ci. Pour la remplacer, cliquer de nouveau sur Choisir.
Owner
The ownership of an item is usually assigned to the user account that creates the item. You can use this dropdown to reassign ownership. The dropdown will load the user names (not email addresses) of users in the installation. Select a new user and save your changes.
Visibilité
Utiliser les bouton public/privé (icône oeil) pour rendre le contenu public ou visible seulement par les utilisateurs du système Omeka S.
Le contenu est public :  {style= »display:inline; »}
Le contenu est privé :  {style= »display:inline; »}
Si un contenu est privé, les médias attachés le sont aussi, mais les médias d’un contenu public peuvent eux aussi être mis en statut public ou privé.
Éditer un contenu
Une fois le contenu créé, il peut être modifié en cliquant soit sur l’icône d’édition (crayon), soit sur le titre du contenu puis sur le bouton « Modifier ce contenu » situé dans le coin supérieur droit de la page.
To cancel out of editing, click the « Cancel » button at the top right of the screen.
Editing options are the same as when creating a new item, with the addition of the ability to add any media which has been saved to an item as a property.
Les médias comme propriété
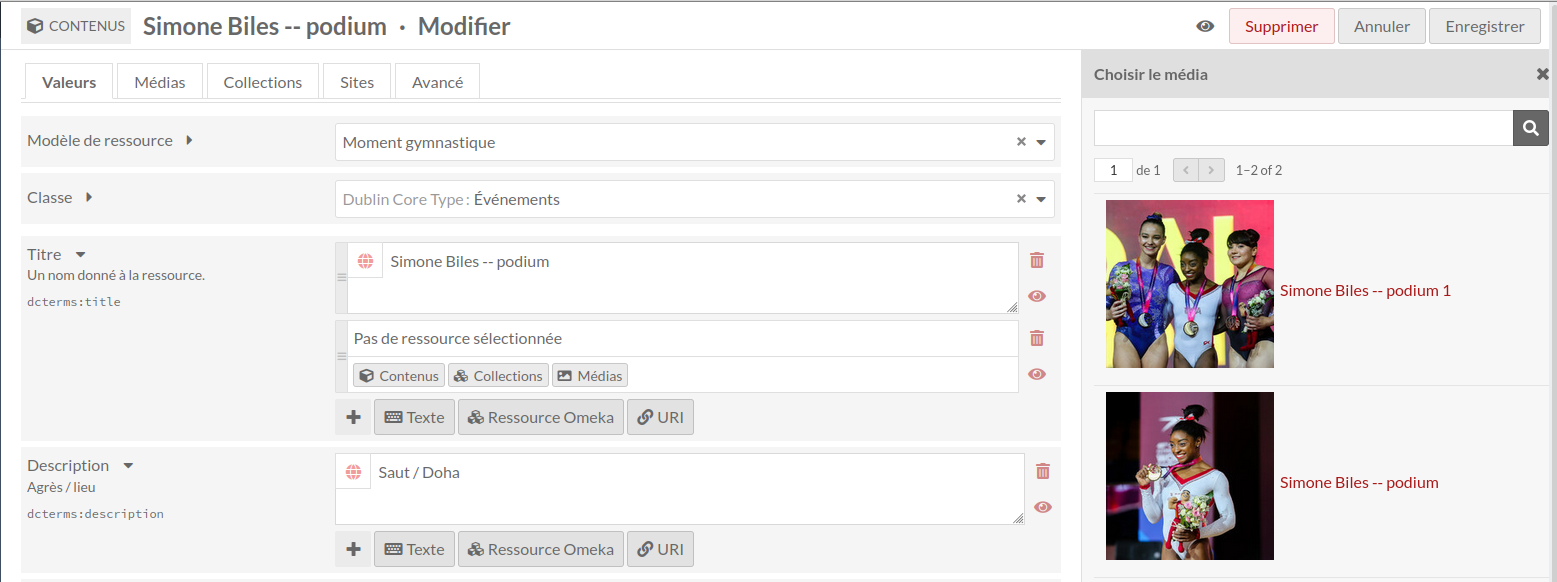
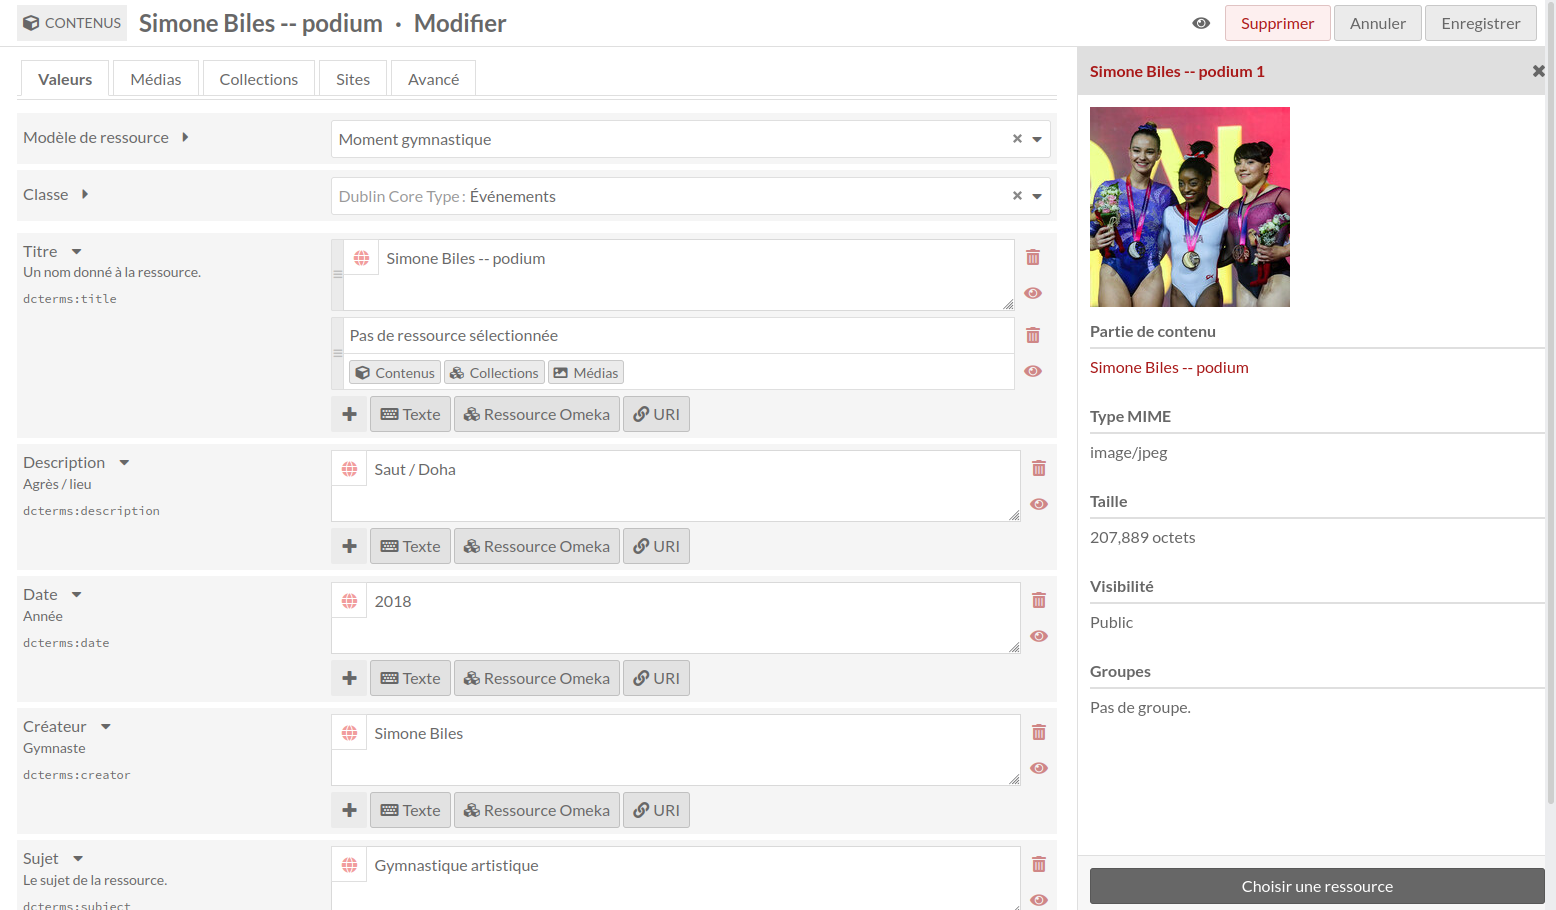
Une fois le contenu créé et ses médias ajoutés, vous pourrez utiliser un média attaché à ce contenu comme propriété.
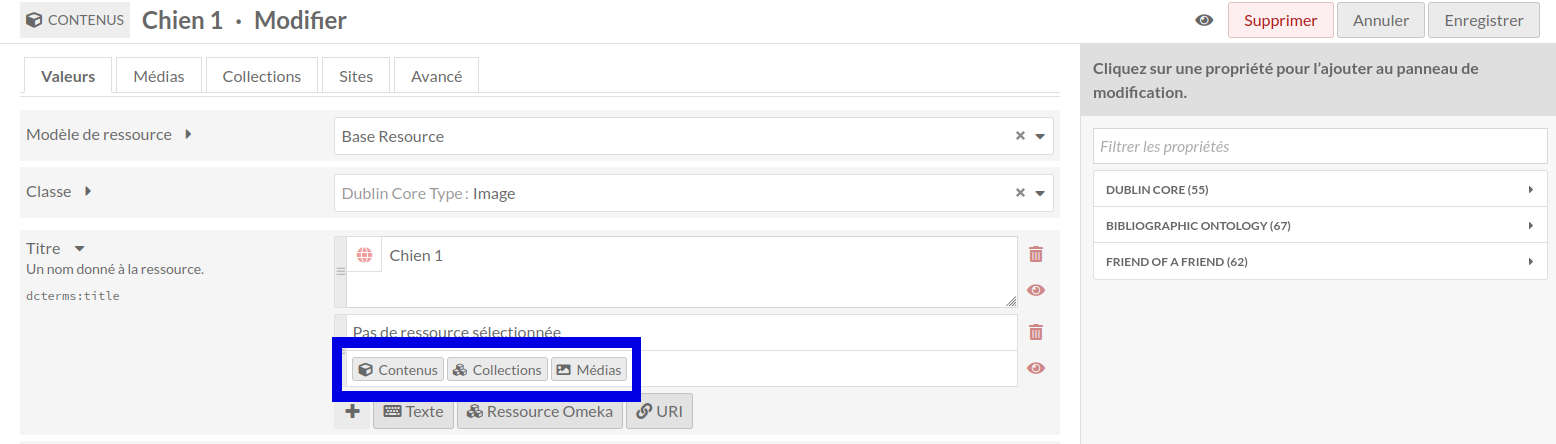
Pour utiliser un média comme propriété, sélectionner l’option média (1). Un volet affiche alors tous les médias attachés au contenu. Sélectionner le média à utiliser (2) ; le volet ne contiendra alors plus que ce média (deuxième image). Cliquer sur le bouton « Choisir une ressource » en bas du volet pour terminer l’opération (3).
Delete an item
To delete an item, you can:
Click the trash can icon in the Items browse page. This will open a right-hand drawer to confirm the deletion.
Click the title of the item in the table on the Items browse page, then click the « Delete » button at the top right of the screen.
Use the batch-deletion methods described below to delete many items at once.
La modification par lots
From the browse page of items (admin/item) you can batch edit items, using the dropdown menu on the left near the pagination buttons. You can select multiple items using the checkboxes on the left of each item’s row.
Editors, Supervisors, and Global Admins can batch-edit and batch-delete all items in the installation. Users that have Author-level permissions can batch-edit or batch-delete their own items, but not items of others. In this case, selecting all of the items on the page, or selecting all items, will only include items they own. Users at the Reviewer level cannot batch-delete all resources, but can batch-delete selected resources.
Les actions de traitement par lots sont les suivantes :
Modifier sélectionnés : ne modifie que les contenus sélectionnés sur la page
Modifier tout : modifie tous les contenus d’un résultat de recherche (par défaut, l’ensemble des contenus)
Supprimer sélectionnés : ne supprime que les contenus sélectionnés sur la page
Supprimer tout : supprime tous les contenus d’un résultat de recherche (par défaut, l’ensemble des contenus).
You can easily select all items on the page using the checkbox at the top of the Items table. The number of results per page is set in the installation’s global settings.
!!! note Batch-editing activities are sometimes shown in the Jobs log, found in the left-hand bar under the « Admin » heading. Only « Edit all » or « Delete all » operations appear here. Batch-editing only selected items, even a full page of items, will not appear here.
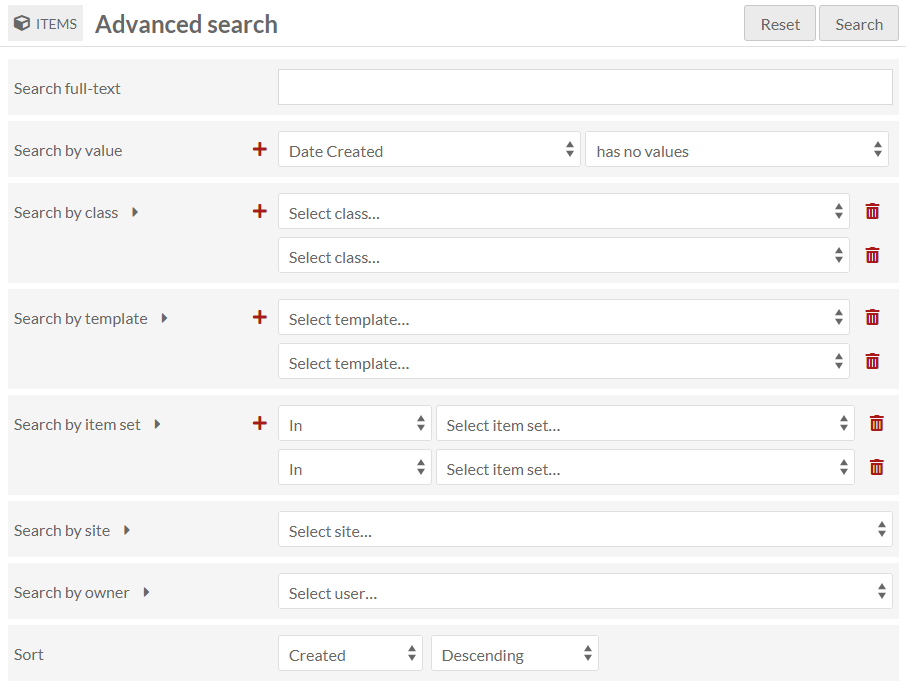
You can first use the « 🔍 Advanced search » link to narrow down the items to a subset for editing. For example, you can use Advanced search to limit to items that are not in any item sets, or items that are owned by a specific user. In the image below, the search is set to capture any item without a « Date created » value.
If you perform a search, or end up on the Items browse page from an Item set or other filter, you will once again see the browse page, with your selected parameters appearing at the top of the screen. From this browse screen you can select items manually for batch editing using the checkboxes on the left, or select all of the items on the page, or use the dropdown to edit all items that are currently in the subset.
If you complete a batch action from the next screen, you will return back to this same item subset.
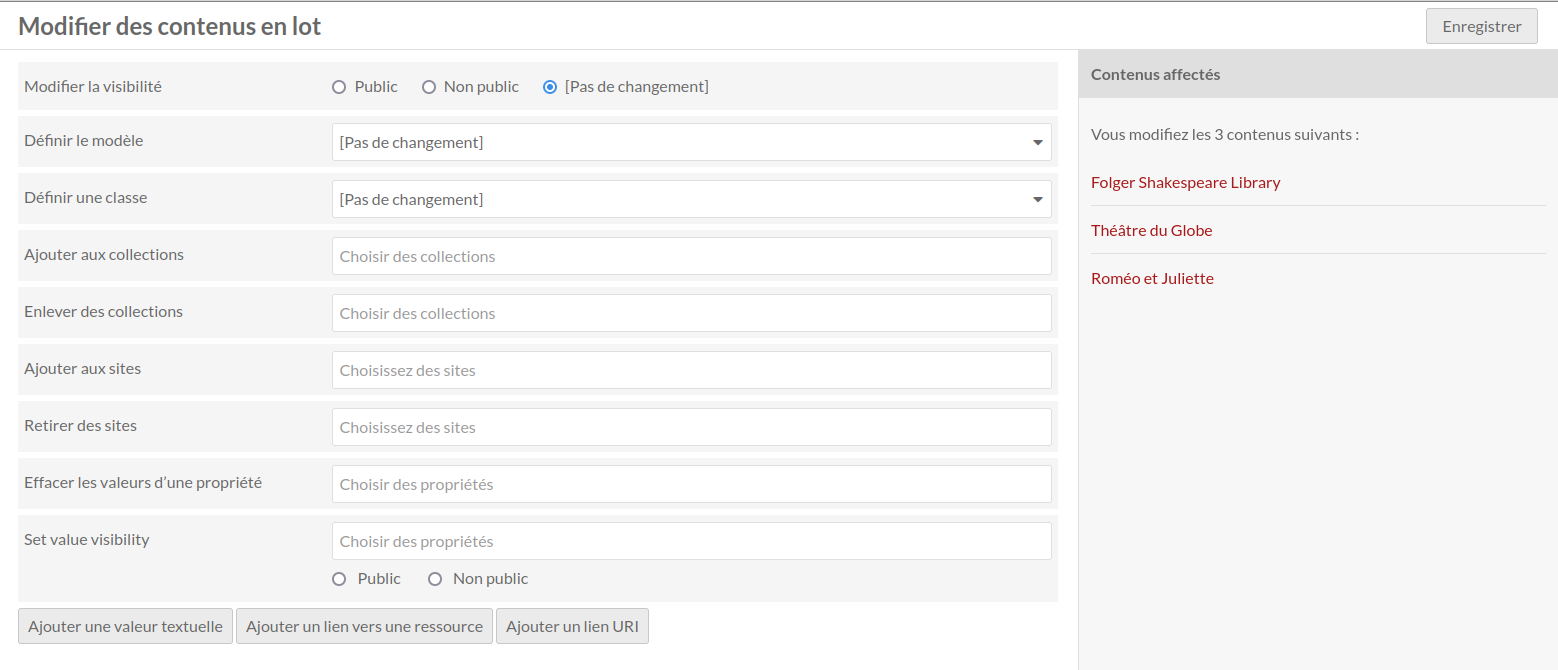
La modification par lots
Batch editing items takes you to a new page. The items being edited will display on the right side in a drawer. Be sure to confirm the number of items being edited looks correct.
The batch edit form gives you the following options:
Set visibility: a radio button. Select from public or not public to make the item visible or not visible to logged-out users.
Set template: a dropdown. Select from the installation’s resource templates. You can remove templates from the selected items with the « [Unset template] » option. A search bar appears at the top of the dropdown menu if you would like to type to search.
Set class: a dropdown. Select from classes of the installed vocabularies. You can remove all classes from the selected items with the « [Unset class] » option. A search bar appears at the top of the dropdown menu if you would like to type to search.
Add to item set: a dropdown and text field. Select from item sets on the installation, organized by owner, or type to search. You can add the selected items to multiple item sets: click in the text field again to see the remaining options.
Remove from item set: a dropdown and text field. Select from item sets on the installation, organized by owner, or type to search. You can remove the selected items from multiple item sets: click in the text field again to see the remaining options.
Add to sites: a dropdown and text field. Select from sites on the installation, or type to search. You can add the selected items to multiple sites: click in the text field again to see the remaining options.
Remove from sites: a dropdown and text field. Select from sites on the installation, or type to search. You can remove the selected items from multiple sites: click in the text field again to see the remaining options.
Clear property values: a dropdown and text field, with all the properties in all vocabularies. Selecting from this will remove any values in that property in the affected items. You can remove multiple property values at once: click in the text field again to see the remaining options.
Set value visibility: a dropdown and text field, with radio buttons. Set the visibility of a specific property or properties to either public or not public. Unlike the radio buttons at the top of the form, this will only affect one or more metadata fields, instead of the entire item (for example, you may wish to hide the « Creator » value on some public items). Select a property from the text field (type to begin searching), and the choose either the « Public » or « Not public » radio button for this option. You can add multiple properties by clicking again within the text field, but they will all become either « Public » or « Not public ».
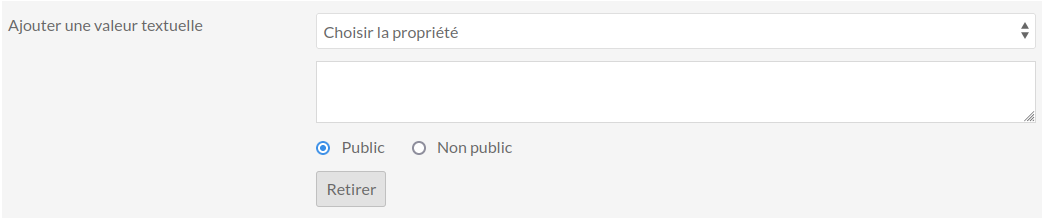
Les boutons en bas du formulaire de modification par lots permettent d’ajouter des propriétés à tous les contenus concernés :
Ajouter une valeur textuelle
Ajouter un lien vers une ressource
Ajouter un lien URI.
Ces actions ajoutent un bloc au formulaire qui permet de sélectionner une propriété parmi celles des vocabulaires de l’instance et d’ajouter une valeur à cette propriété.
Suppression par lots
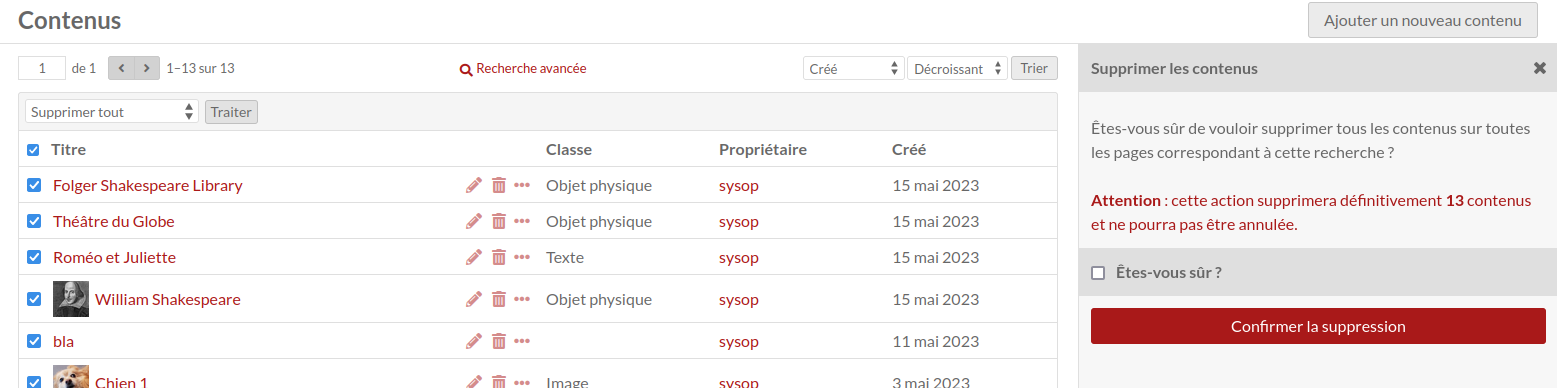
L’action supprimer fait apparaître un volet à la droite de la page rappelant le nombre de contenus concernés. La suppression n’aura lieu que si vous cliquez sur le bouton rouge « Confirmer la suppression ». Cette action ne peut pas être annulée une fois le bouton cliqué. Pour quitter l’option avant suppression, cliquer sur le « X » en haut à droite du volet de suppression. En cas d’action « Supprimer tout », cliquer sur la case à cocher « Êtes-vous sûr ? » puis sur « Confirmer la suppression ».
Certains modules individuels peuvent aussi permettre des actions d’édition par lots. Ces options sont indiquées dans la documentation associée à chaque module.