Collections
Les collections sont une agrégation de contenus, similaires aux collections des versions précédentes d’Omeka. Dans Omeka S, les contenus peuvent appartenir à un nombre illimité de collections, et une collection peut comporter un nombre illimité de contenus.
Item Set permissions
When a user creates an item set, they become the « owner » of that item set. Most user levels have the ability to create item sets, and can always delete their own item sets. Only higher levels can delete item sets that others own.
Users can add items to item sets that are open to additions, and the item sets that they own (regardless of their open or closed status). Global Admins and Supervisors can add any items to any item set.
Category |
Permission |
Global Admin |
Supervisor |
Editor |
Reviewer |
Author |
Researcher |
|---|---|---|---|---|---|---|---|
Item sets |
Add |
Yes |
Yes |
Yes |
Yes |
Yes |
No |
Edit |
All |
All |
All |
All |
Their own |
No |
|
Delete |
All |
All |
All |
Their own |
Their own |
No |
|
Value annotations |
Add/Edit |
Yes |
Yes |
Yes |
Yes |
Yes |
No |
Private objects |
View |
Yes |
Yes |
Yes |
Yes |
No |
No |
Note that when you change a user’s role, for example from an Author to a Researcher, they will still own the item sets they created when they had permission to do so. Item sets are not transferred. Deleting a user orphans their item sets - they will appear as having no owner. Only Global Admins can re-assign ownership of item sets.
The Item Sets tab
Les collections sont gérées via l’onglet Collections (icône de boîtes empilées) situé dans le panneau de navigation de gauche.
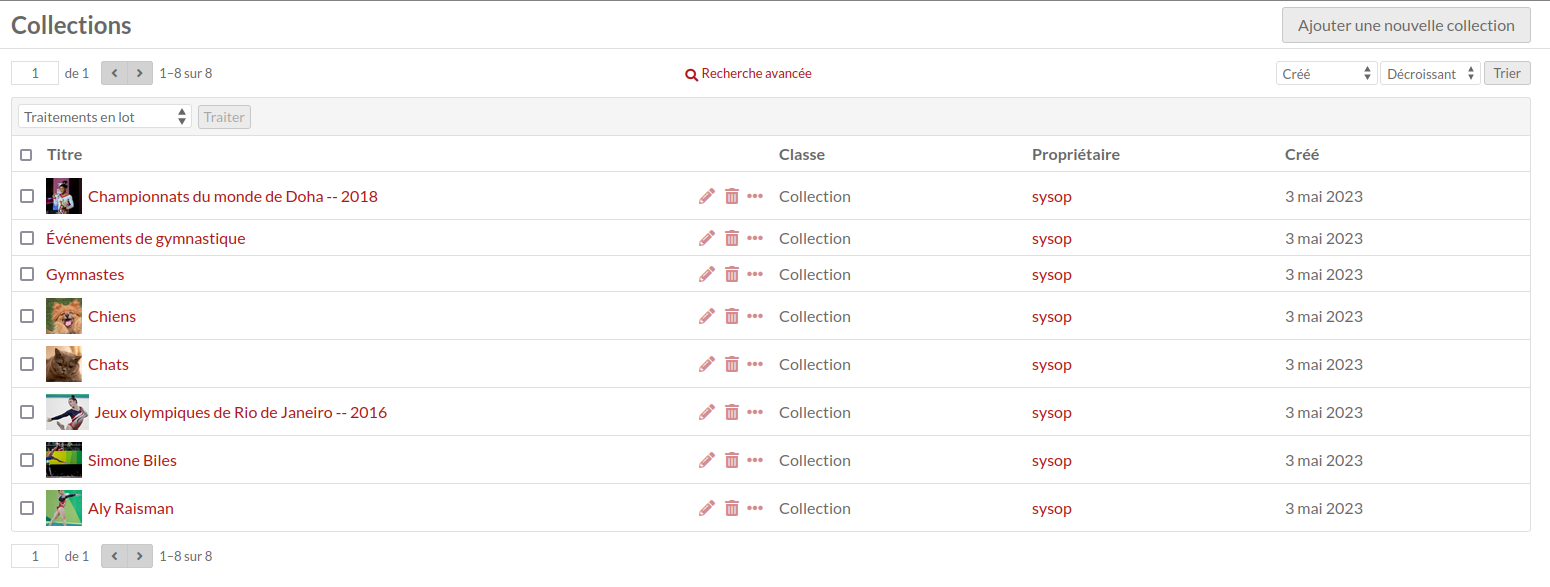
Après avoir cliqué sur l’onglet, un tableau apparaît répertoriant toutes les collections avec :
leur titre
des icônes pour chaque ligne représentant des options pour modifier (crayon), supprimer (corbeille) ou afficher les détails (points de suspension)
the item set’s Class
le propriétaire de la collection
et quand la collection a été créée.
In the top right corner of the Item Sets screen is the « Add new item set » button.
Options for navigating and creating item sets sit in the header of the table of items.
On the left side are controls for the pages of item sets, with forward and back arrows, and a field to go a specific page of item sets.
Au centre se trouve le bouton pour la recherche avancée.
À droite, des menus déroulants vous permettent de réorganiser le tableau par titre, classe, propriétaire, ou date créée dans l’ordre croissant ou décroissant.
Voir les collections
To quickly see information about an item set, click on the « Details » button (the ellipsis icon) for the item set on the item sets browse page. This will open a column on the right hand side of the page with the item set’s title, visibility, and number of items.

Pour afficher toutes les informations d’une collection, cliquez sur son nom. Sur la page de la collection, des onglets permettent de voir les métadonnées et ressources liées d’une collection. Sur le côté droit de la page d’affichage, vous trouverez des informations sur la date de création, le propriétaire et la visibilité. Pour les collections, la visibilité inclut à la fois si la collection est privée ou publique et si d’autres utilisateurs peuvent ajouter des contenus à la collection.
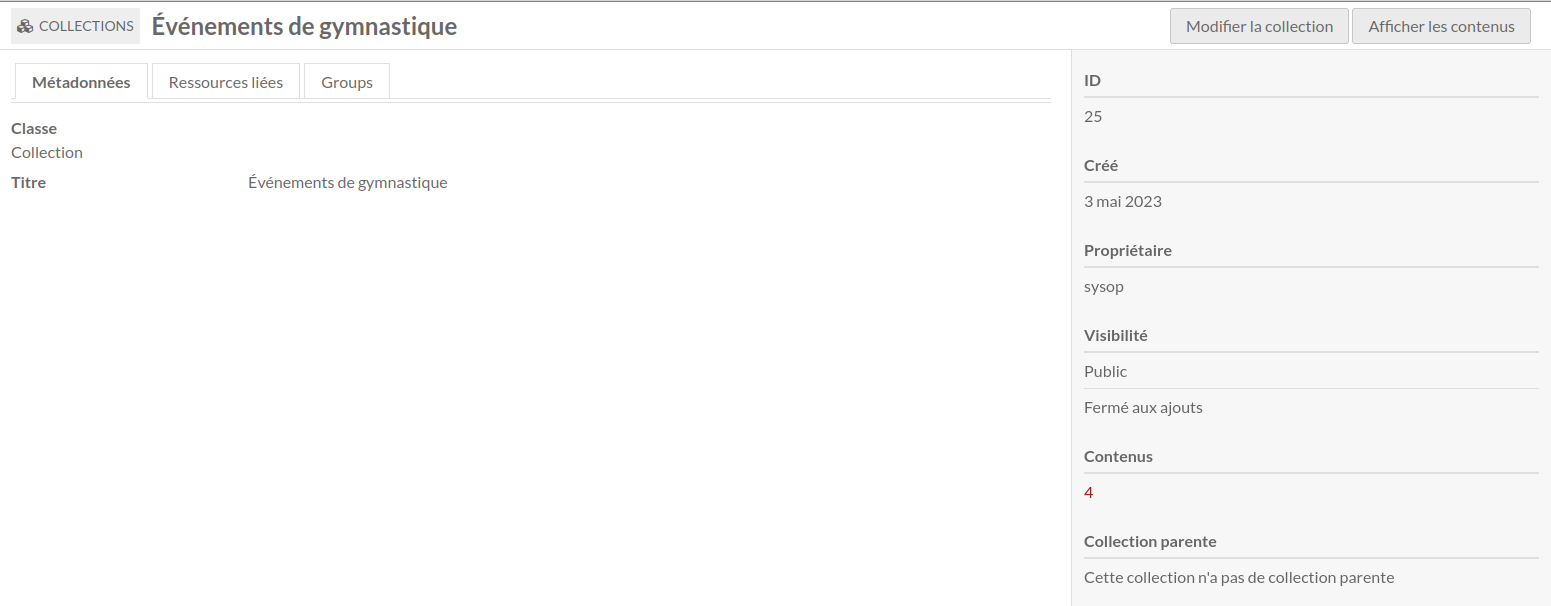
To view the items in an item set, either click on the number of items in the set on the item set browse page, or click the « View items » button in the upper right corner of the individual item set page.
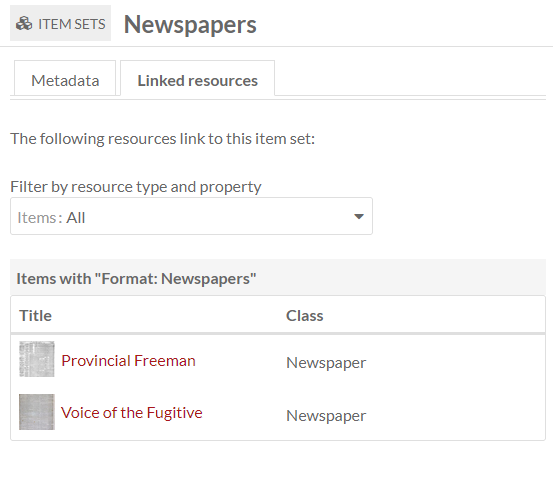
Linked resources
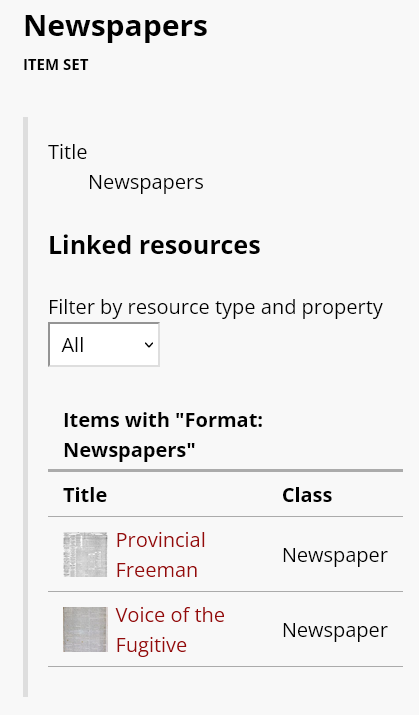
An item set’s linked resources are other Omeka resources (items, item sets, or media) that are linked to this item set through their properties. Note that this section only shows resources that have been linked to this item set (which have it for a property); resources that are linked from this item will display in the property they fill.
Linked resources are grouped by the property for which they use the current item. In the example below, the current item set « Newspapers » is used for the property « Format » for the linked resources.
You can filter linked resources to only display those referencing a specific property using the dropdown « Filter by property ». It will only display properties actively in use.
When an item set is viewed on the public site, all linked resources are displayed in a series of tables based on the metadata property in use. Resources are sorted by resource type (item, item set, or media) and only one type is displayed at a time. An item set without any linked resources will not display these tables; item sets displaying on sites that are set to exclude resources that are not included in the site will also not display these entries.
The display of linked resources on resource pages can be configured on each site. Click on « Theme » and then click the button that reads « Configure resource pages », then decide if and where to display the « Linked resources » tables for each resource.
You can also control whether resources that are linked will display those links even when the resources in question are not added to the given site. Under Site settings, in the « Show » section, you will find a checkbox for « Exclude resources not in site. »
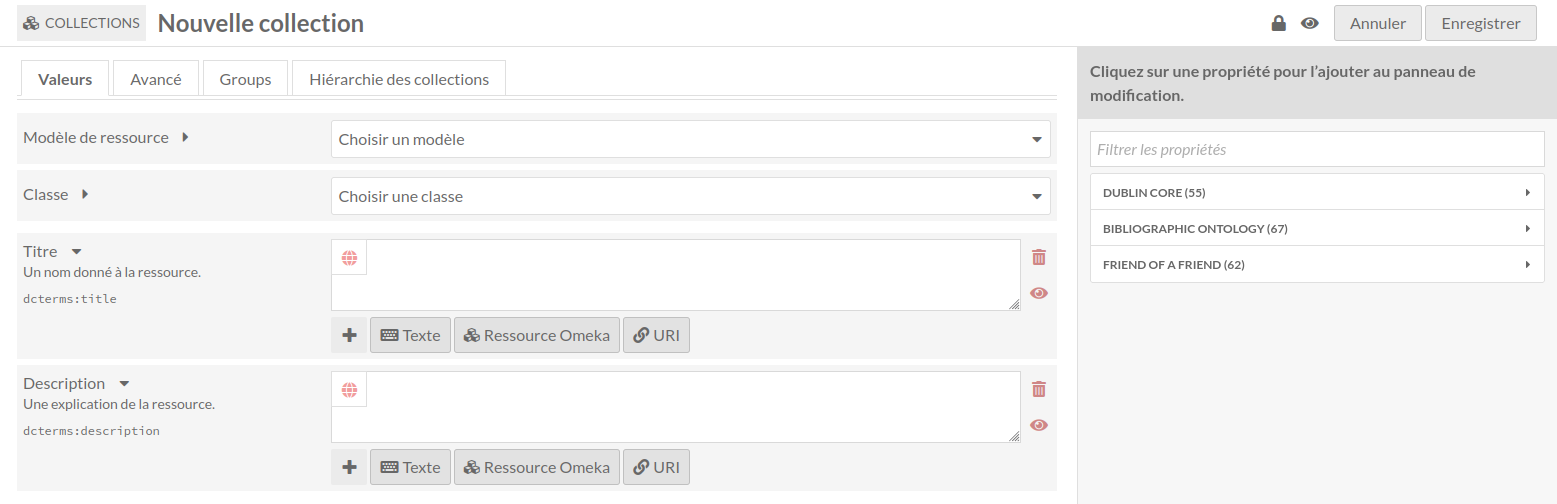
Ajouter une collection
To add a new item set, click the Item Sets tab from the left-hand navigation of the dashboard. Click the « Add new item set » button on the right hand side of the screen.
By default, a new item set will load with the properties dcterms:title and dcterms:description. You may add other fields by selecting a property from the list on the right. Browse fields by vocabulary (Dublin Core, Bibliographic Ontology, etc.), or search in the Filter properties bar above the list of properties and vocabularies.
Item sets may use the same resource templates available for items to provide pre-selected fields. Common fields for item sets include a short textual description using dcterms:Description. This text (only the first entry, if there are multiple description entries) will display on the « Browse item sets » page by default (found at youromekaurl/site-slug/item-set). All metadata fields will display when a user views the item set on the public side (found at youromekaurl/site-slug/item-set/1, where « 1 » is the ID of the item set).
Vous pouvez ajouter d’autres champs en sélectionnant une propriété dans la liste de droite. Parcourez les champs par vocabulaire (Dublin Core, ontologie bibliographique, etc.) ou recherchez dans la barre filtrer les propriétés au-dessus de la liste des propriétés et des vocabulaires.
Values
Vous pouvez ajouter du texte, une ressource Omeka ou un lien externe dans chaque champ.
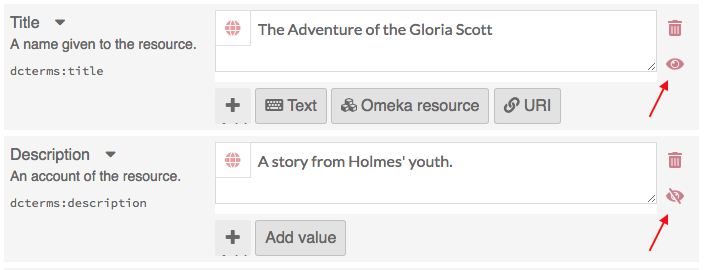
You can set individual property values as Private or Publicly visible using the eye icon for each value. Note that properties set to private are still visible to Global Admins, Site Admins, and Editors. Authors will be able to see all properties on items they own, but will not see private properties created by other users.
Dans l’image ci-dessous, la première propriété (Titre) est publique, comme l’indique l’icône en forme d’œil ouvert. La deuxième propriété (Description) est privée, comme l’indique l’icône d’œil barré. En cliquant ou en appuyant sur entrer sur l’icône de l’œil, vous basculez entre public et privé.
Texte
Text fields allow for unformatted text entry. No markup is allowed in these fields (e.g. bold, italic, Markdown, HTML).
You can indicate the language for the content of an input using the globe symbol above the input. Click on the globe to activate a text field, then enter the ISO 639-1 code for the language in which the text is written.

Omeka resource
These fields create an internal link between the resource you are creating and the resource that fills that field.
You have the option to use either another item or an item set.
Choisir un type de ressource ouvrira un tiroir où vous pourrez parcourir toutes les ressources de l’instance. Vous pouvez utiliser la fonction de recherche en haut du tiroir pour restreindre la liste ou pour trouver rapidement un contenu ou une collection spécifique.
Le choix d’un type de ressource ouvrira un onglet latéral dans lequel vous pourrez parcourir tous les types de ressources de l’instance. Vous pouvez utiliser la fonction de recherche en haut de l’onglet pour réduire la liste ou pour trouver rapidement un contenu ou une collection.
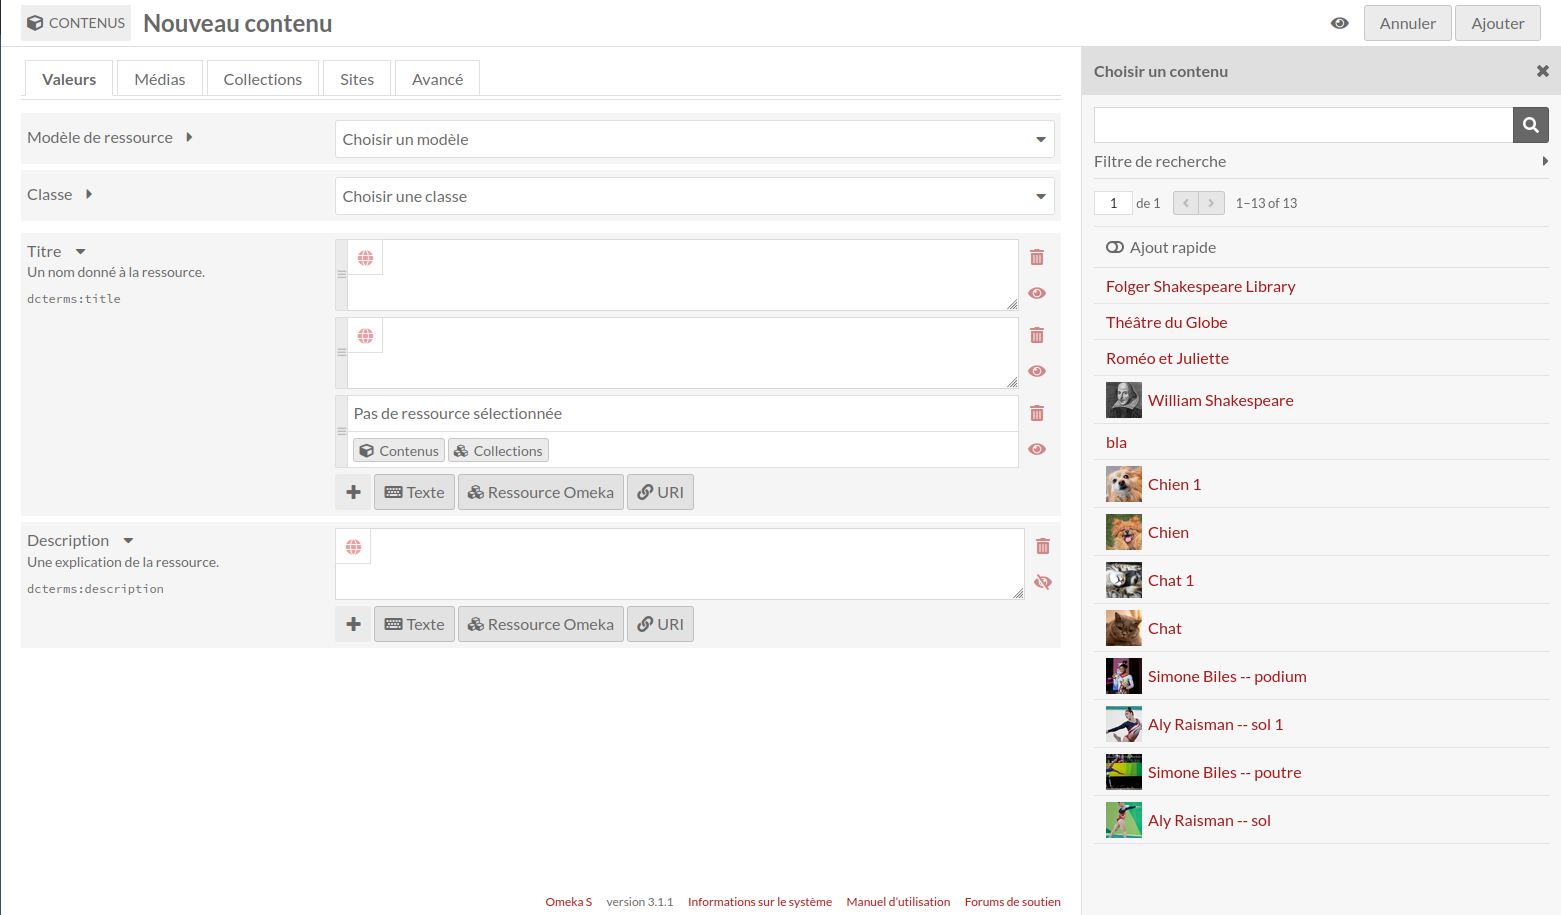
Si vous utilisez un contenu comme propriété, vous aurez d’autres options pour rechercher l’élément souhaité dans l’onglet dédié. Ouvrez ces options en cliquant sur le triangle situé à côté de la phrase « Filtre de recherche ».
Cela ouvrira un menu sous le bouton avec les options suivantes pour filtrer les éléments dans le tiroir :
Filter by class: a dropdown where you can select any class provided by the vocabularies on the installation
Filtrer par collection : une liste déroulante permettant de limiter les contenus affichés dans l’onglet à ceux associés à une collection particulière
Filter by item ID: a search field where you can input the ID of the item you want to use. You can find an item’s ID in the URL of its edit page; if you are editing the item and the URL is
admin/item/11547/editthen the item’s ID is 11547.
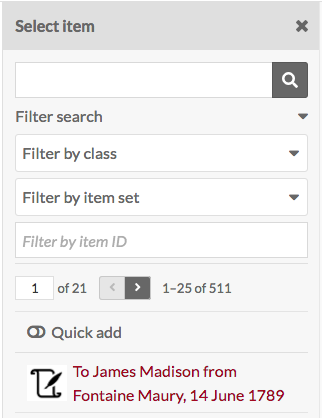
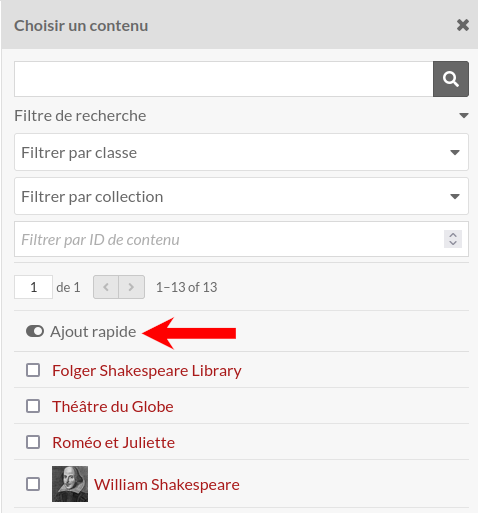
Les collections ont également une option « Ajout rapide ». Lorsque cet interrupteur est activé, tous les contenus de l’onglet se retrouvent affichés avec une case à cocher. Vous pouvez utiliser ces cases à cocher pour ajouter plusieurs contenus à la fois en tant que propriété. Notez que vous ne pouvez modifier qu’une propriété à la fois, de sorte que tous les contenus doivent renseigner la même propriété (ex, Creator, Has Part).
URI
URI fields link to an external website or online resource. Every URI value has the link itself, and an optional textual Label to replace the URI with something human-readable. For example, you may wish to enter in a Creator as a URI to a controlled vocabulary of artists or authors, and then include the creator’s name in plain text as the Label. Omeka will not automatically pull information from the URI.
Value annotation
When you input a value for a property associated with a resource, you are making a statement about that resource. If you choose, Omeka allows you to make statements about that statement. We call this value annotation. The advantage of value annotation is that you can choose to make ambiguous facts more concrete by annotating things like:
Provenance: Where is this fact from?
Time: When did this fact occur?
Location: What is the location associated with this fact?
Certainty: What is the confidence of this fact?
Type: What type of concept/thing is this fact?
In the world of linked data, this process is know as reification. Each value can have any number of annotations.
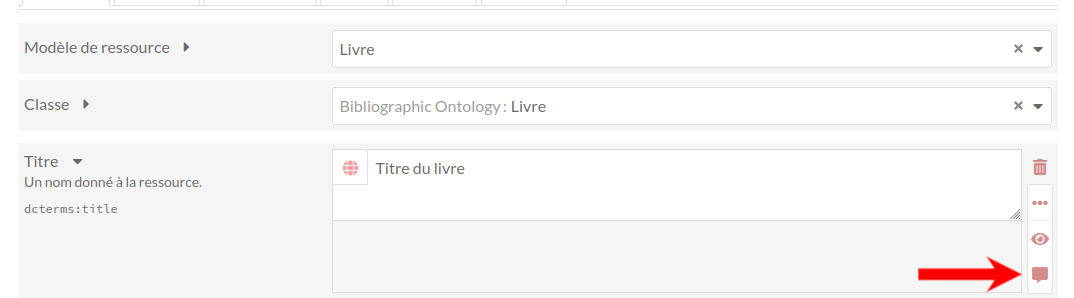
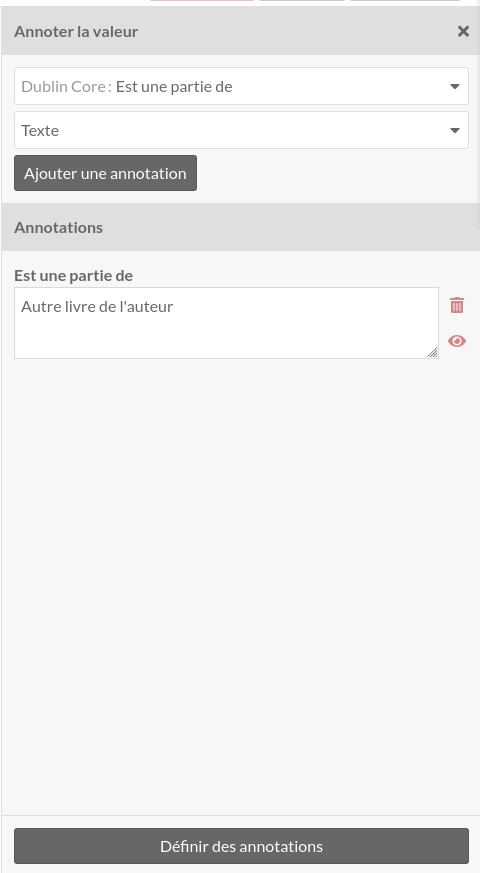
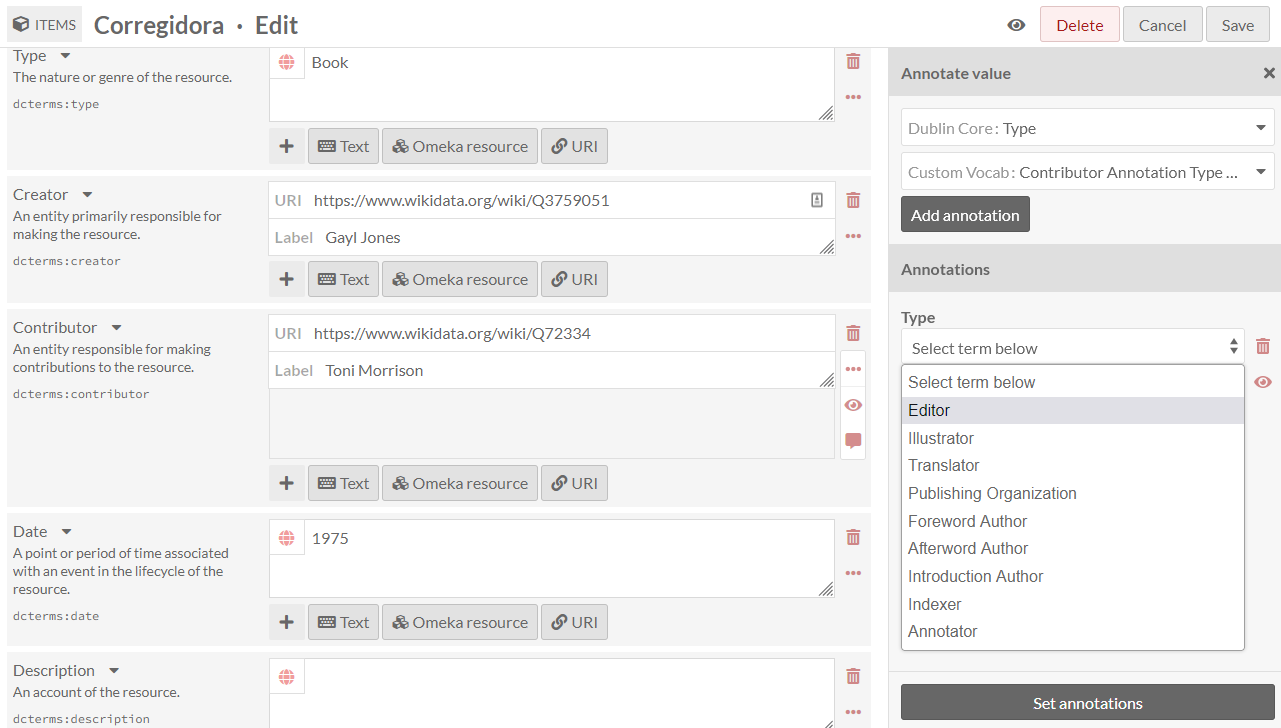
To create an annotation, click on the ellipsis on the right side of the value input interface, and then click on the annotation icon (the speech bubble).
The annotation sidebar will open to the right. Select any property that is available within the Omeka S installation to describe the relationship between the annotation and the value it describes. For instance, the value for associated with the property dcterms:Contributor might be annotated with more detail about the nature of the contribution. Or you may wish to simply include a note using the dcterms:Description field.
Select a data type for the annotation: a text field, a URI, or resource in your Omeka S installation. Modules may make additional data types available. Click the « Add annotation » button and a new field will appear below. Input your annotation. You can do this multiple times for the chosen value if desired. Then click « Set annotations » to finalize the process.
Each site has a setting to indicate whether or not value annotations are visible to the public. This will include value annotations on items and media.
You can set controlled vocabularies for annotations using the Custom Vocab module. In this case, you do not need to apply a custom vocabulary to a property using a resource template; you can select any installed vocabulary from the value-type dropdown in the drawer. This will load your vocabulary’s choices into a dropdown of terms.
Advanced
Par défaut, Omeka S utilisera le support du premier élément ajouté à une collection pour générer la vignette illustrant cette collection. Si vous souhaitez utiliser une autre image vous pouvez la définir ici.

Les ressources que vous avez sélectionnées et téléchargées sous forme de vignettes dans cet onglet sont les mêmes que celles créées pour les logos du site.
Pour attribuer une vignette, cliquez sur le bouton Sélectionner dans la zone de travail principale de l’onglet. Cela ouvrira un onglet sur le côté droit.
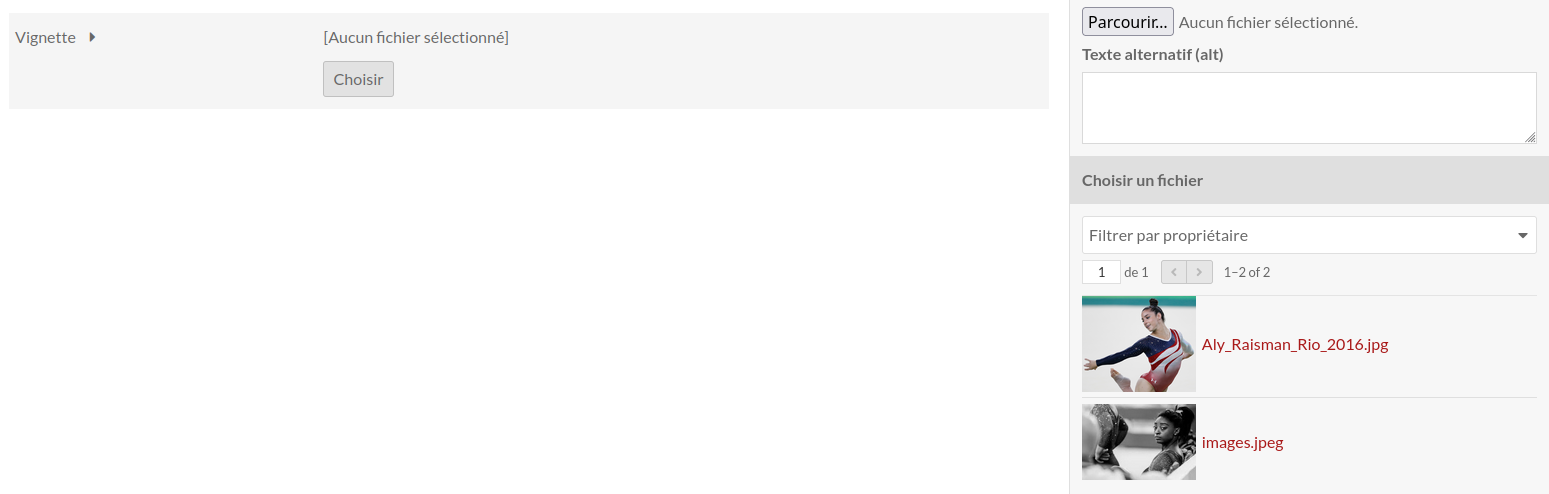
L’onglet propose deux options: télécharger un fichier à l’aide de votre navigateur ou sélectionner des ressources existantes. Pour sélectionner une ressource existante, cliquez simplement dessus et elle sera automatiquement attribuée à la collection.
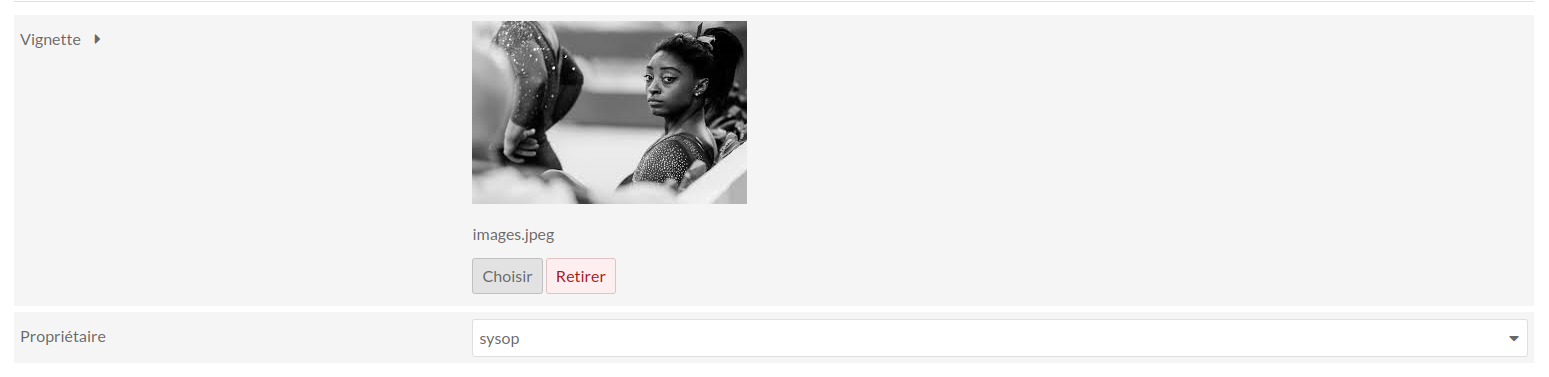
To remove an asset which you have assigned as a thumbnail, click the « Clear » button below the image of the asset. To replace it, click « Select » and either choose or upload a new thumbnail asset.
Access settings
Les collections ont deux paramètres de contrôle d’accès. Elles peuvent être publiques ou privées et elles peuvent être ouvertes ou fermées.
Utilisez le bouton Rendre public/privé (icône en forme d’œil) pour rendre l’élément visible au public ou uniquement à tous les utilisateurs de l’installation Omeka S (privé).
Open sets can be edited and added to by any user on the installation.
Les collections fermées sont disponibles et modifiables uniquement par son créateur, les administrateurs du site et les administrateurs globaux.
 Ouvert et Public
 Fermé et Privé
Notez que les paramètres public/privé et ouvert/fermé fonctionnent indépendamment - vous pouvez définir un élément comme ouvert et privé, par exemple.
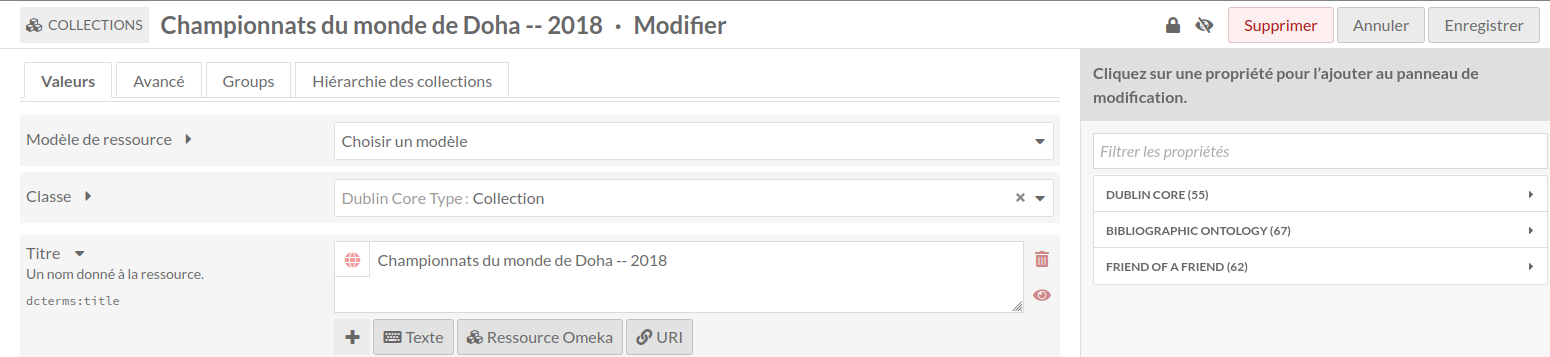
Editer une collection
Une fois que vous avez créé une collection, vous pouvez la modifier à tout moment, en cliquant sur l’icône d’édition (bouton du crayon) ou en cliquant sur le titre de la collection, puis en cliquant sur le bouton Modifier dans le coin supérieur droit de l’écran.
Les options pour l’édition d’une collection sont les mêmes que pour la création d’une collection.
Pour annuler les modifications, cliquez sur le bouton Annuler dans le coin supérieur droit, entre les boutons Supprimer et Enregistrer.
Delete an item set
You can delete individual item sets, or batch-delete multiple item sets, as described below.
Deleting item sets does not delete any items associated with the item set.
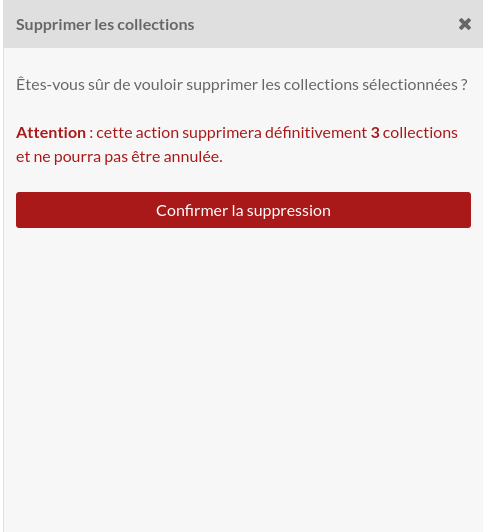
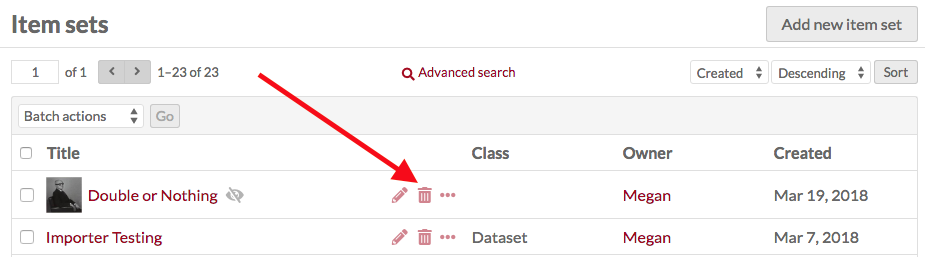
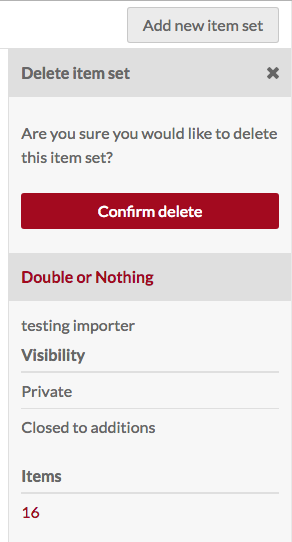
Dans l’écran Collections, vous pouvez supprimer une collection en cliquant sur l’icône corbeille sur la ligne correspondante à la collection que vous souhaitez supprimer. Cela ouvrira un onglet sur la droite avec un message en haut vous demandant de confirmer que vous souhaitez supprimer la collection, avec les métadonnées pour la collection situées sous le bouton de confirmation de suppression. Cliquez sur Confirmer la suppression pour supprimer la collection ou fermez l’onglet pour annuler.
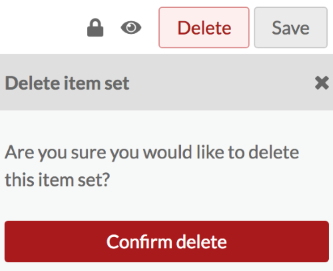
Dans la page d’édition d’une collection, cliquez sur le bouton Supprimer dans le coin supérieur droit. Cela ouvrira un onglet sur le côté droit vous demandant de confirmer que vous souhaitez supprimer la collection. Cliquez sur Confirmer la suppression pour supprimer la collection ou fermez l’onglet pour annuler.
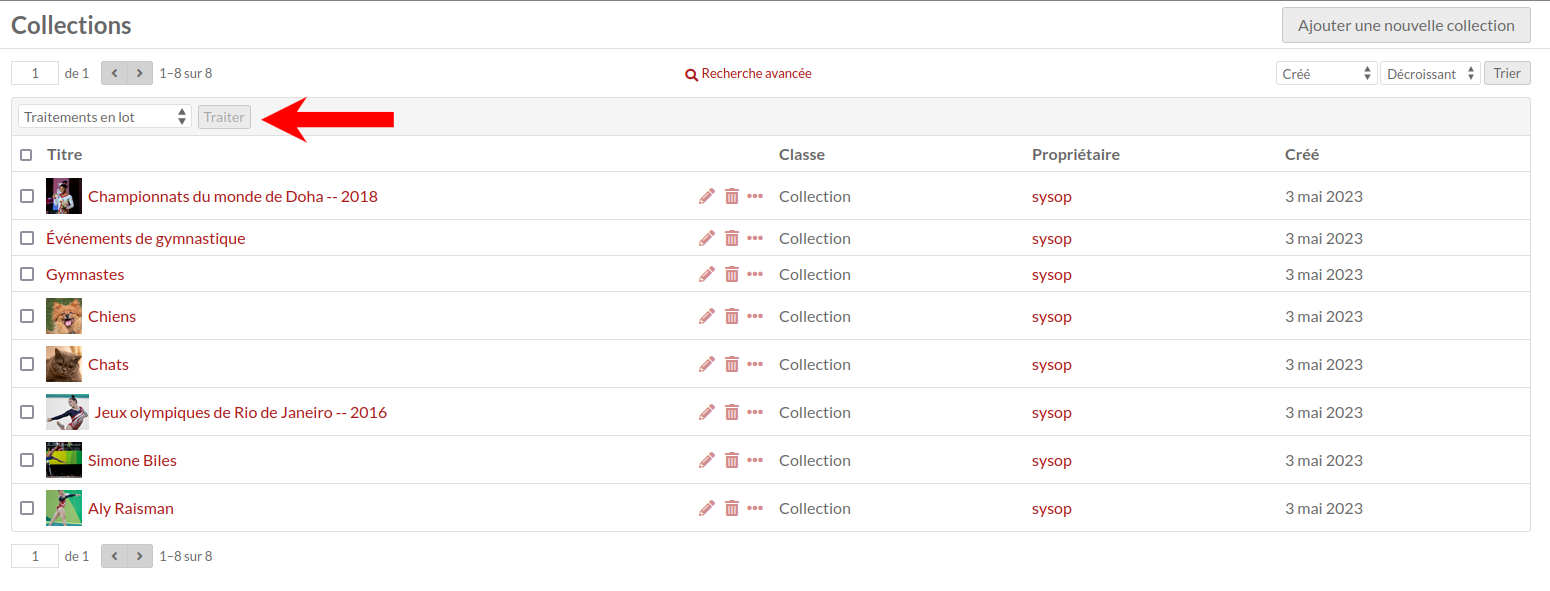
Batch actions
From the browse page of item sets (admin/item-set) you can batch edit item sets, using the dropdown menu on the upper left, near the pagination options. You can select item sets manually for batch editing using the checkboxes on the left, or select all of the item sets on the page, or use the dropdown to edit all item sets that are currently in the subset.
Editors, Supervisors, and Global Admins can batch-edit and batch-delete all item sets in the installation. Users that have Author-level permissions can batch-edit or batch-delete their own item sets, but not item sets of others. In this case, selecting all of the item sets on the page, or selecting all item sets, will only include item sets they own. Users at the Reviewer level cannot batch-delete all resources, but can batch-delete selected resources.
Les actions par lot sont les suivantes:
Modifier sélectionnés : modifiez uniquement les collections sélectionnées sur la page
Modifier tout : éditez toutes les collections renvoyées par une recherche (par défaut, toutes les collections)
Supprimer sélectionnés : supprime uniquement les collections sélectionnées sur la page
Supprimer tout : supprime toutes les collections renvoyées par une recherche (par défaut, toutes les collections)
The number of results per page is set in the installation’s global settings.
You can first use the « 🔍 Advanced search » link to narrow down the item sets to a subset for editing. For example, you can use Advanced search to limit to item sets that are owned by a specific user.
If you perform a search, you will once again see the browse page, with your selected parameters appearing at the top of the screen. From this browse screen you can select item sets manually for batch editing using the checkboxes on the left, or select all of the item sets on the page, or use the dropdown to edit all item sets that are currently in the subset.
If you complete a batch action from the next screen, you will return back to this same item set subset.
Traitement en lot
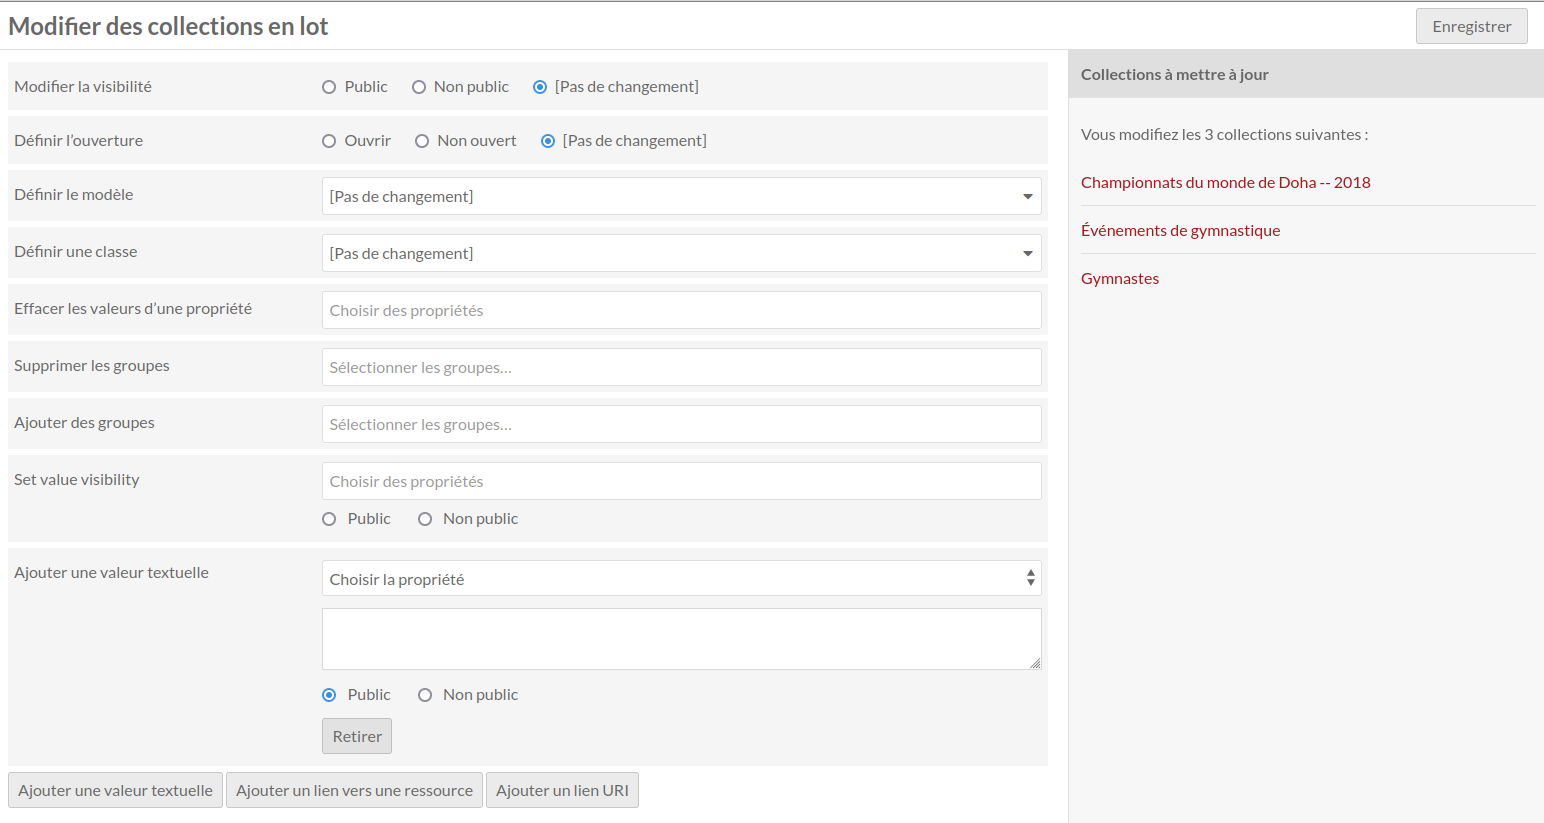
Batch editing item sets takes you to a new page. The item sets being edited will display on the right side in a drawer. Be sure to confirm the number of item sets being edited looks correct.
The batch edit form gives you the following options:
Set visibility: a radio button. Select from public or not public to make the item set visible or not visible to logged-out users.
Set openness: a radio button. Select from open or not open. Open sets can be edited and added to by any user on the install; closed sets are available and editable only by its creator, site admins, and global admins.
Set template: a dropdown. Select from the installation’s resource templates. You can remove templates from the selected item sets with the « [Unset template] » option. A search bar appears at the top of the dropdown menu if you would like to type to search.
Set class: a dropdown. Select from classes of the installed vocabularies. You can remove all classes from the selected item sets with the « [Unset class] » option. A search bar appears at the top of the dropdown menu if you would like to type to search.
Clear property values: a dropdown and text field, with all the properties in all vocabularies. Selecting from this will remove any values in that property in the affected item sets. You can remove multiple property values at once: click in the text field again to see the remaining options.
Set value visibility: a dropdown and text field, with radio buttons. Set the visibility of a specific property or properties to either public or not public. Unlike the radio buttons at the top of the form, this will only affect one or more metadata fields, instead of the entire item set (for example, you may wish to hide the « Creator » value on some public item sets). Select a property from the text field (type to begin searching), and the choose either the « Public » or « Not public » radio button for this option. You can add multiple properties by clicking again within the text field, but they will all become either « Public » or « Not public ».
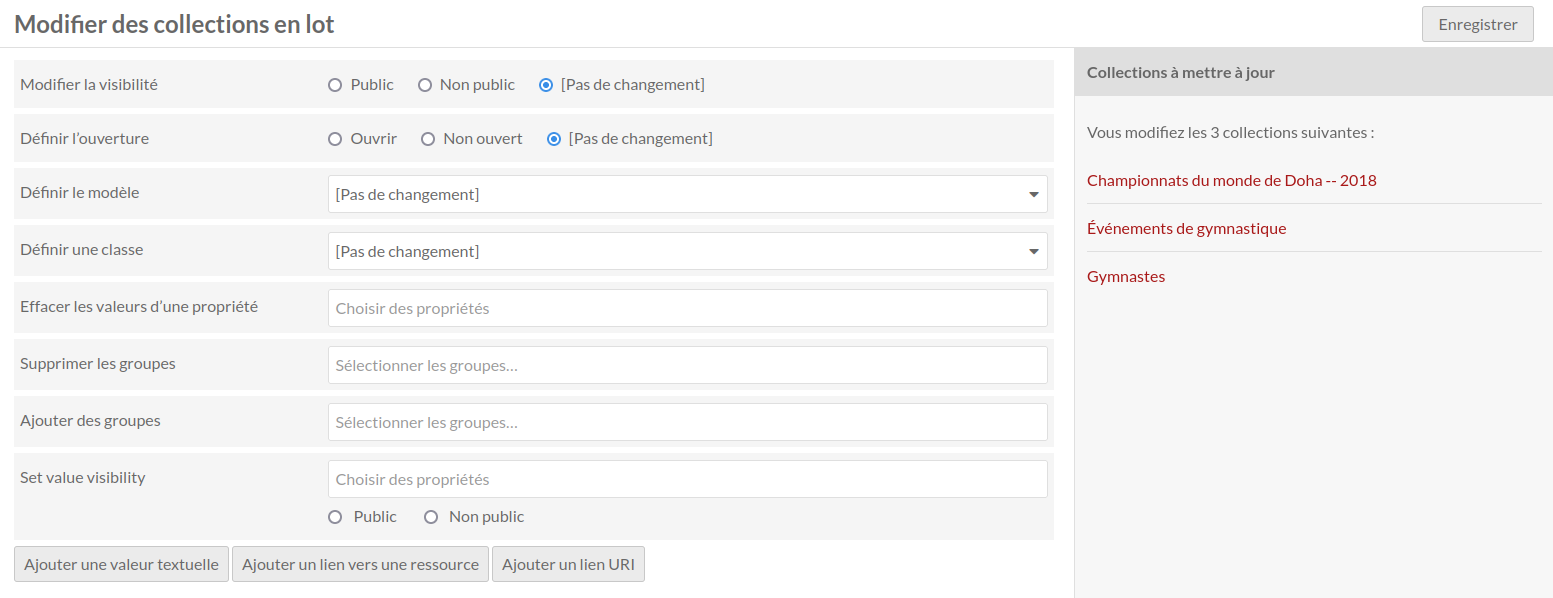
De plus, vous pouvez utiliser le bas du formulaire de modification par lot pour ajouter des propriétés à chaque ensemble d’éléments :
Add text value
Add resource value
Add URI value.
La sélection de ces éléments ajoutera un bloc au formulaire dans lequel vous pourrez sélectionner une propriété parmi les vocabulaires installés et saisir la valeur de cette propriété.
Batch deleting
Pour les actions de suppression, un onglet s’ouvre sur le côté droit de l’écran pour vous indiquer le nombre de collections à supprimer. Rien ne sera supprimé à moins que vous ne cliquiez sur le bouton rouge Confirmer la suppression. Cette action ne peut pas être annulée. Pour refuser de supprimer les collections, cliquez sur le X dans le coin supérieur droit de l’onglet de suppression. Pour confirmer la suppression, cochez la case « Êtes-vous sûr ? », puis cliquez sur Confirmer la suppression. Notez que la suppression d’une collection ne supprimera pas les contenus associés à cette collection.